How to Export Outlook Emails to Excel with Date and Time? 5 Proven Methods
The common and free method to export Outlook emails to Excel with date and time is by using copy-paste method. It lets you to export single Outlook emails to Excel spreadsheet one by one. On the other side, if you want to want to do it in bulk, you can use the Outlook’s Import/Export Wizard, automate the process with a VBA macro, connect Outlook to Excel through Power Query, or use any third-party tool that supports bulk exports.
In this guide, we will describe 5 reliable methods to convert Outlook email to Excel. Read them all one by one and choose the best as per your need. As, the best method depends on the number of emails you need to export and whether you want a one time export or an automated solution.
Table of Contents
- When Should You Export Outlook Emails to Excel?
- Methods to Export Outlook Emails to Excel
- Method 1: Copy-Paste Method
- Method 2: Using Import/Export Wizard
- Method 3: Automatically Export Using VBA
- Method 4: Extract Using Power Query
- Method 5: Convert Using a Professional Tool
- Video Tutorial
- Final Words
- Frequently Asked Questions
When Should You Export Outlook Emails to Excel?
There are many real-world scenarios where exporting Outlook emails to Excel is useful such as:
- To create a list of Outlook emails where you can easily search anything.
- Maintain email details for compliance or audit requirements.
- To track conversation history of clients.
- To create email activity reports.
- Filter emails by sender, subject or date received.
- To share mailbox information with colleagues or coworkers.
- For further analysis of email data in Excel spreadsheet.
- Analyze Outlook data with Excel filters, PivotTables, charts or for graphical representation of data.
So, these were some common scenarios where you may require to export emails from Outlook to Excel spreadsheet.
Now, let’s go through the methods below that will help you accomplish the task.
Methods to Export Outlook Emails to Excel with Date and Time
There are many solutions available that claim to export Outlook emails to Excel with date and time. However, few of them exactly does the same. After trying and testing several methods, we have come up with 5 different ways that will help you quickly complete this task. Before choosing a method, it’s suggested to compare all the options as per your needs and requirements.
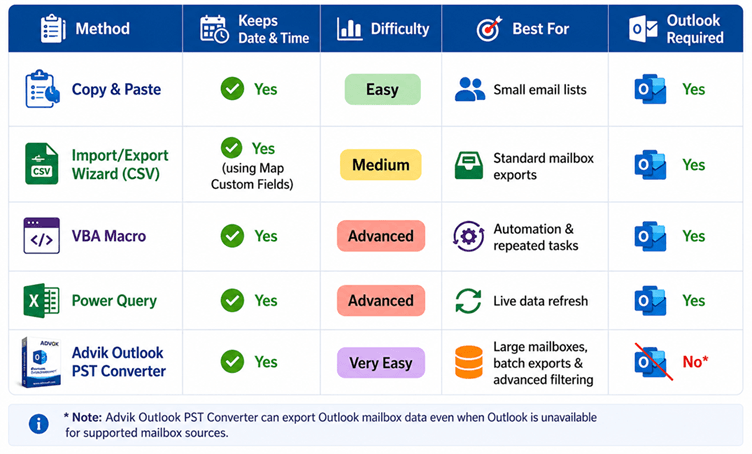
The table below highlights each method based on whether it preserves date and time, difficulty level, best for which types of users and whether Outlook is required or not. So, compare them as per your need and proceed with the one that suits best for your requirements.
Method 1. Copy Outlook Emails to Excel with Date and Time
If you want to export Outlook email list to Excel with date and time, then Copy & Paste method is the fastest solution. Unlike other manual approaches, this method copies the visible email information to Excel immediately. And, it also includes important columns such as Subject, Sender, Received Date, Received Time, Size, and Categories (depending on the Outlook view you are using).
This is useful if you need to export a few emails and don’t want to create a CSV file or use other tools.
Steps to Copy Outlook Emails to Excel
Step 1. Launch Outlook app and go straight to the folder which contains your emails that you need to export it into Excel.
Step 2. Choose the emails you want to export. Either press Ctrl + A to select all emails or select one emails at a time.
Step 3. Copy the selected emails. For this, press Ctrl + C or right-click the selected emails and choose Copy option.
Step 4. Now, open Microsoft Excel on your system and create a new worksheet.
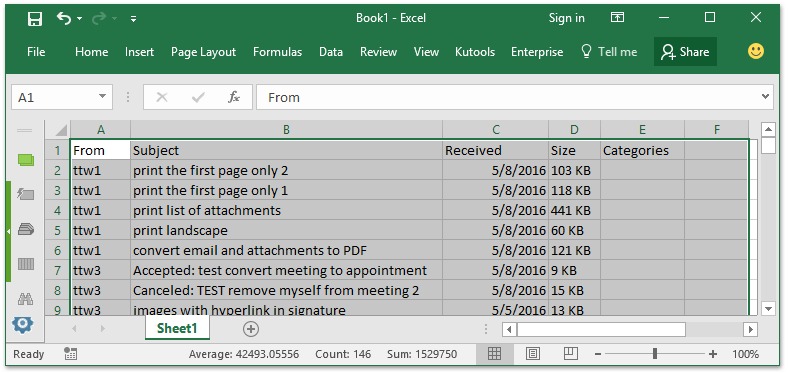
Step 5. Here, paste the emails. For this, press the ctrl + V. Excel will paste the selected Outlook email list into rows and columns.
Depending on your Outlook view, you will see;
You have successfully copied Outlook emails to Excel with date and time without exporting a CSV file or using any third party application.
This method is especially useful when you want to export a list of emails from Outlook to Excel with date and time for various needs such as reporting, auditing or quick record keeping.
Note: The data copied to Excel depends on the columns that are currently shown in Outlook. If the Received Date or Received Time column is not there, add it before copying the emails.
Method 2. Export Outlook Emails to Excel (CSV) Using Import/Export Wizard
If you want to export Outlook emails to Excel without any third-party software, then the best method is to use the built-in Import/Export Wizard in Outlook. It exports your mailbox data to a CSV (Comma Separated Values) file that you can easily open in Microsoft Excel.
If you need to export Outlook emails to CSV, export Outlook email list to Excel, or make a spreadsheet with email information such as sender, subject, received date, then this method is perfect for you.
Note: The method works in Outlook Classic. New Outlook doesn’t have the Import/Export Wizard. If you have New Outlook then use the Copy & Paste method above or the professional method described later in this guide.
Steps to Export Outlook Emails to Excel Using CSV
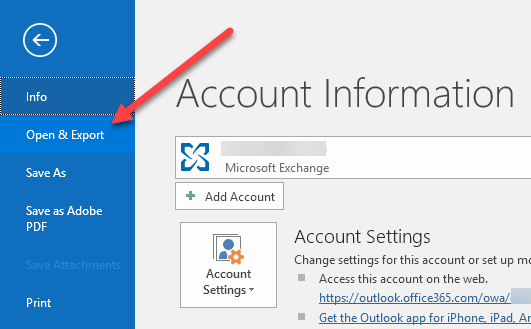
Step 1. Run MS Outlook on your system and click File tab.
Step 2. Now go to Open/Export option.
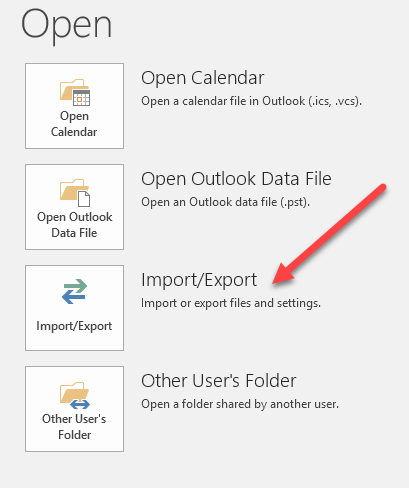
Step 3. On the right side menu click Import/Export.
Step 4. A new tab will open, which looks the same in all Outlook version. Click “Export to file”.
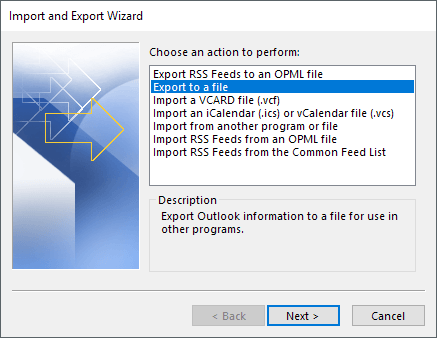
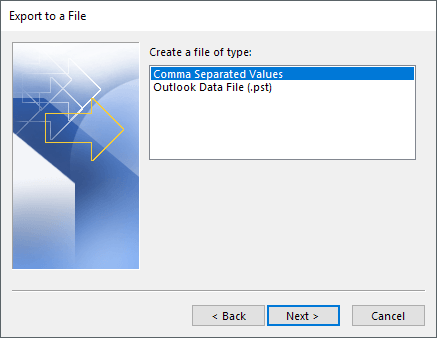
Step 5. Now choose Comma Separated Values from Export to a File window and click Next.
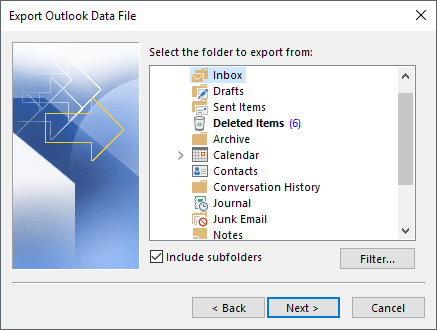
Step 6. Select the mailbox folders you want to export into Excel.
Step 7. Click on ‘Browse’ to choose the location where you want to save the CSV file & click Next.
Step 8. Now, click on the Map Custom Fields option and verify correctly.
If any field is missing then drag and drop it from left panel to correct destination field and click the Finish button.
Now, Outlook will begin exporting the selected folder and the required depends on the size of your mailbox.
Once exported, go the folder where you have chosen to save the CSV file.
Double click on it and open it in Excel.
Here, you can see all your displayed Outlook email information in separate fields.
Method 3. Automatically Export Outlook Emails to Excel Using VBA
If you regularly export Outlook emails then using a VBA which stands for (Visual Basic for Applications) macro is a method that will be useful for you. VBA method automates the process and it can export email details like Subject, Sender, Recipient, Received Date & Time and other things to Excel sheet directly.
The VBA macro automatically connects with Outlook and Microsoft Excel. Once it get access then it reads the emails from your selected Outlook folder and create an excel worksheet of the same details. It is useful for bulk export, just run it for once and it will export your Outlook emails to Excel automatically.
Steps to Export Outlook Emails to Excel Using VBA
Step 1. Open Microsoft Excel on your system and create a new blank worksheet.
Step 2. Now, press, Alt + F11; it will open the Microsoft VBA editor.
Step 3. Next, click Insert tab in the menu and choose click Module option.
Step 4. Now, copy the following code and paste into the module.
Sub ExportOutlookEmailsToExcel()
Dim olApp As Object
Dim olNamespace As Object
Dim olFolder As Object
Dim olMail As Object
Dim xlSheet As Worksheet
Dim i As Long
Set xlSheet = ThisWorkbook.Sheets(1)
xlSheet.Cells(1, 1) = “Subject”
xlSheet.Cells(1, 2) = “Sender”
xlSheet.Cells(1, 3) = “Received Date & Time”
Set olApp = CreateObject(“Outlook.Application”)
Set olNamespace = olApp.GetNamespace(“MAPI”)
Set olFolder = olNamespace.GetDefaultFolder(6)
i = 2
For Each olMail In olFolder.Items
If olMail.Class = 43 Then
xlSheet.Cells(i, 1).Value = olMail.Subject
xlSheet.Cells(i, 2).Value = olMail.SenderName
xlSheet.Cells(i, 3).Value = olMail.ReceivedTime
i = i + 1
End If
Next
MsgBox “Export Completed Successfully!”
End Sub
Step 5. Next, press the F5 button to run the Macro.
Step 6. Now, the macro has begin exporting Outlook email information into Excel.
Step 7. Once the process completes, you will get output Excel sheet look like this;
Now, access it and sort it as per your need.
Important: Perform these steps only if you have VBA knowledge and not recommended for non-technical users.
Method 4. Extract Outlook Emails to Excel Using Power Query
Power Query is one of the best in built options available in Microsoft Excel to automatically export Outlook emails to Excel. It connects Excel directly to your Outlook mailbox via Microsoft Exchange or Microsoft 365 and allows you to refresh the spreadsheet when new emails are received.
Steps to Export Outlook Emails to Excel Using Power Query
Step 1. Launch Microsoft Excel on your computer and create a new workbook.
Step 2. Go to the Data tab and click Get Data >> From Online Services >> From Microsoft Exchange Online.
Step 3. Next, sign in with your Microsoft Account. If asked, then sign in using the same Microsoft account connected with your Outlook mailbox.
Step 4. Now, choose the folder you want to export into Excel. Power Query will display a preview of the available email data.
Step 5. Here, select the columns you want to load into Excel sheet.
Step 6. Now, filter your data as per the following options.
Step 7. Lastly, click the Home button >> Close and load.
In a few minutes, depending on your mailbox size, the excel will create a table containing your Outlook emails.
Note: It will also get updated when new emails arrive. It is useful for weekly or monthly reporting.
Method 5. Convert Outlook Emails to Excel with Date and Time Professionally
After going through above methods, we have understood that these manual methods work for small mailboxes. Also they have limitations, such as some don’t export attachments, some need technical knowledge etc. And most of them get slow when exporting thousands of emails.
If you are looking to convert Outlook emails to Excel with date and time in a quick and accurate way, then a professional solution like Advik Outlook PST Converter is more practical. It simplifies it and allows you to export large Outlook mailboxes without multiple manual steps.
Also, it maintains the complete mailbox folder hierarchy without modifying its originality. Plus, all the key elements (such as cc, bcc, date, time, signature, hyperlinks, etc.) of emails will be preserved without losing any single bit of information.


Steps to Export List of Emails from Outlook to Excel
Step 1. Run the software on your Windows computer and read the instructions.
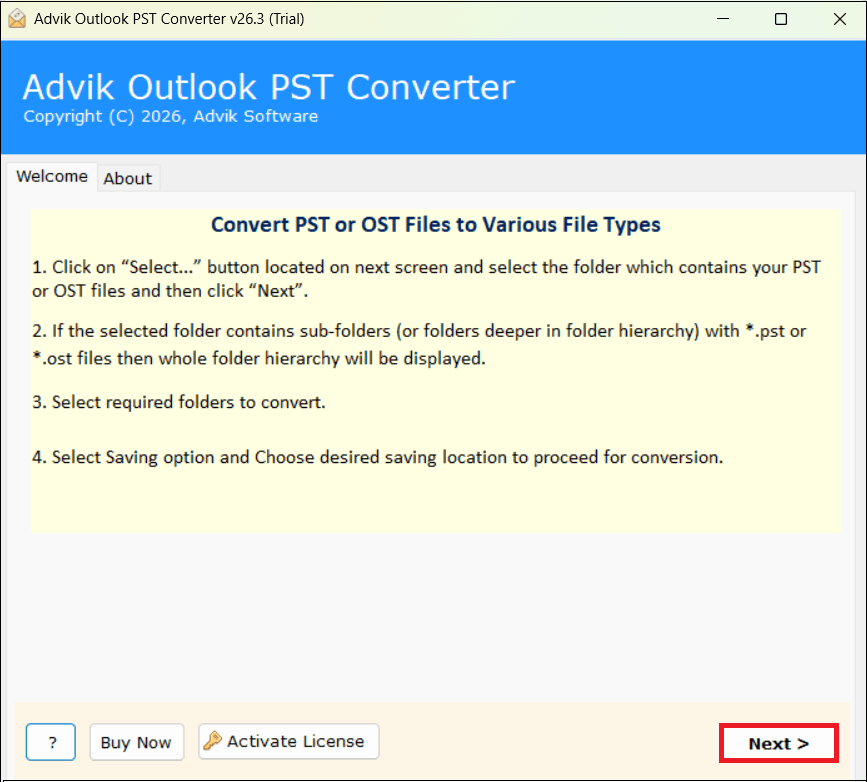
Step 2. Once the software detects your Outlook profile then, click the Next button.
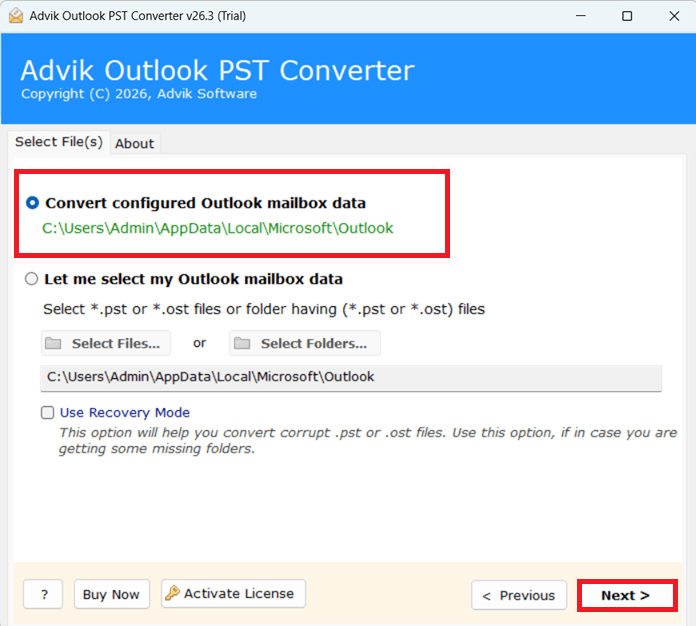
Step 3. Thereafter, choose required mailbox folders and click Next.
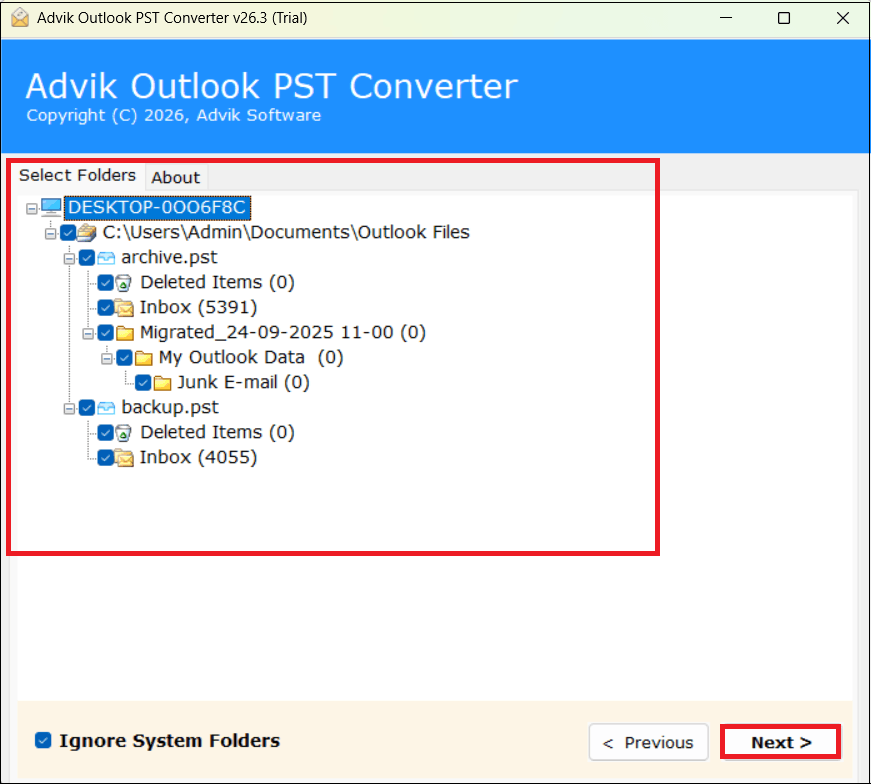
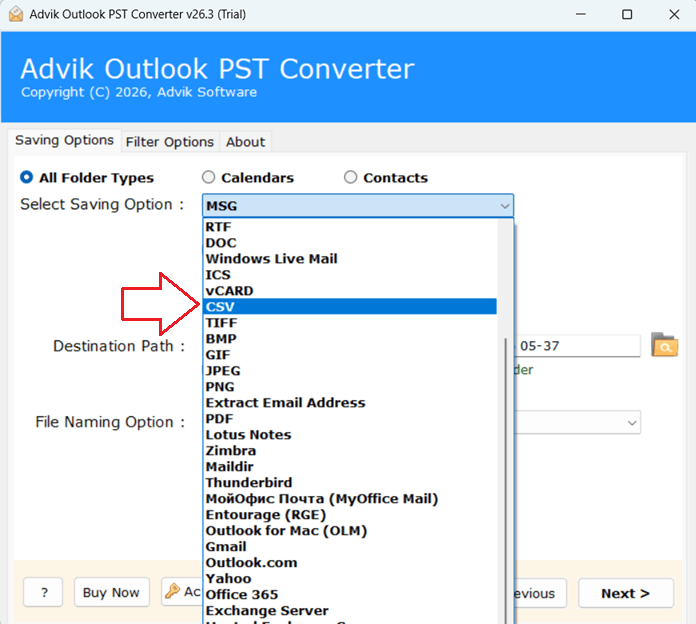
Step 4. Select CSV from the saving options list.
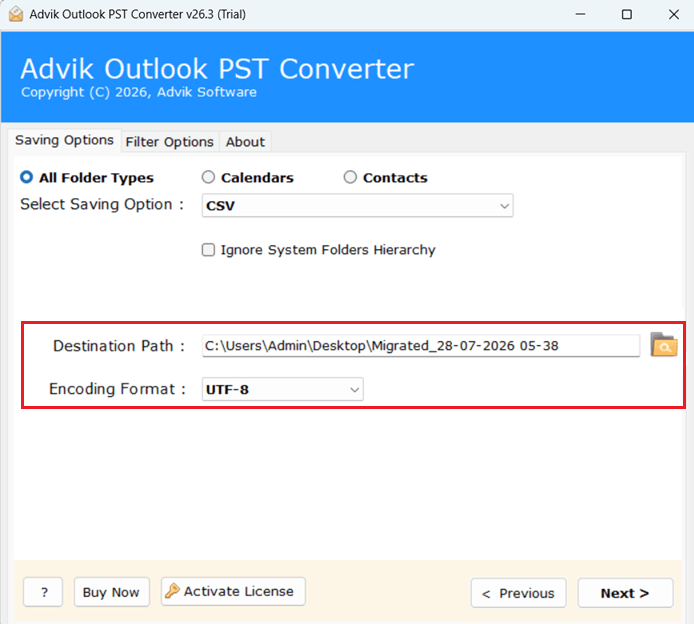
Step 5. Choose a destination location & encoding format to save the resultant CSV file.
Encoding Format: Select either UTF-8 or UTF-16 to save the exported CSV file in the proper character encoding. The UTF-8 encoding is the most suitable to display special characters and foreign language email content correctly.
Step 6. Click on the Next button to begin the exporting process.
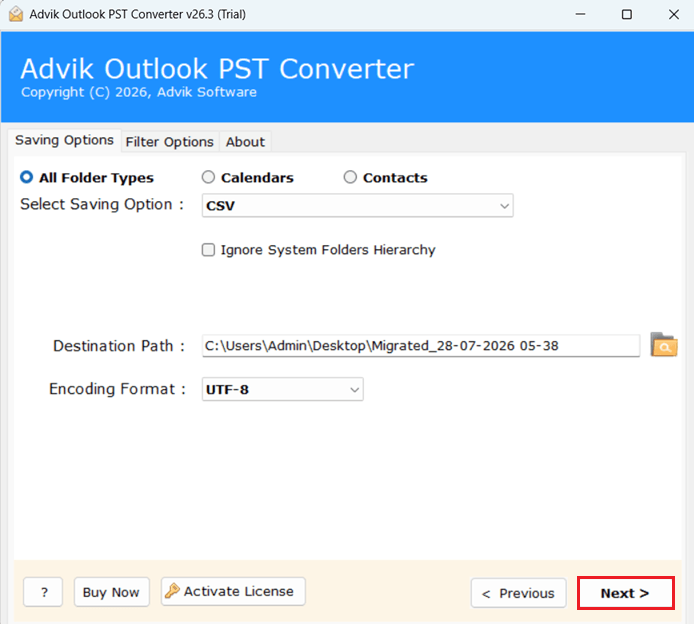
Soon, the software will export all your selected Outlook emails into Excel CSV file format.
Now, you can open and access Outlook emails in Excel Spreadsheet.
Learn How to Export Outlook Emails to Excel with this Video Guide
Prefer to watch instead of read? Watch the video below to learn how you can extract email data from Outlook to Excel with date and time using Advik Outlook PST Converter. Follow the steps to quickly convert Outlook email data while preserving important email informations like sender, subject, and received date.
Why Choose Advik Outlook PST Converter?
Unlike manual methods, the software is designed for customized email conversion. You can choose various options to export your Outlook emails as per your needs.
Such as that;
- You can export Outlook emails directly to Excel compatible formats.
- Preserve email metadata, including subject, Sender, Recipient, Received Date & Time, sent date, etc.
- Batch export multiple Outlook folders.
- Maintain folder hierarchy.
- Export selected emails using date filters.
- Preserve Unicode characters and formatting.
- Simple interface suitable for beginners.
- Supports large Outlook data files.
Final Summary
Despite knowing the fact that manual ways provide less information as compared to the automated solution, we have offered all the possible methods. However, you can choose a manual solution if you want to send a few emails from Outlook to Excel without any filter. To export Outlook emails to Excel with date and time try using an automated software only. All the methods are explained with step-by-step instructions, check out each one and make a wise decision.
FAQs
Q1. How do I export selected Outlook emails to Excel with date and time?
Ans. To convert selected Outlook emails to Excel with date and time you need to use a professional solution.
Q2. Why is date and time missing in my exported file?
Ans. Outlook does not export all fields by default. During export click Map Custom Fields Include “Received” or “Sent” Fields.
Q3. Can I export only last two months emails?
Ans. Yes, apply a filter: View > View Settings > Filter , choose a date range and export.
Q4. How to auto update excel with new emails from Outlook?
Ans. To auto update excel with new Outlook you can use VBA script or Power Automate.
Q5. How to export emails from several folders into one Excel file?
Ans. Outlook export each folder in a CSV file, to do it you need to merge them. While VBA Script or professional tool can export all folders into one Excel file.