How to Import PST to Excel: 2 Easy Methods
Microsoft Outlook stores emails, contacts, calendars and other mailbox data in a PST (Personal Storage Table) file. PST files are mostly used to store emails data of Outlook but not good for analysis of large amounts of email data. That’s why so many users are looking for a way to import PST data into Microsoft Excel.
In this guide, we will explain two practical ways to import PST data to Excel:
Method 1. Export PST data to CSV using Microsoft Outlook
Method 2. Use Advik PST Converter to convert one or more PST files to CSV if you need a faster workflow or you don’t have Outlook installed.
We’ll also discuss the pros and cons of each approach so you can decide which is best for your situation.
Table of Contents
- Why Import PST to Excel? (Common Use Cases)
- Methods to Open Your PST File in Excel
- Method 1: Import PST to Excel Using Microsoft Outlook
- Method 2: Convert PST to Excel Without Outlook
- Why Do PST Conversion Tools Export to CSV Instead of XLSX?
- Watch How to Transfer PST Files into Excel Sheet
- Key Benefits of Using Advik PST Converter
- Manual Method vs. Advik PST Converter: Feature Comparison
- Conclusion
- Frequently Asked Questions
A Common Scenario: Why Users Need to Import PST into Excel
Let’s suppose that you are using Microsoft Outlook since a long time. It’s obvious then you may have collected thousands of emails in your mailbox from clients, vendors, employees and business partners.
Now you have to:
- Print a report of all the customer communications.
- Extract email addresses from PST file for business use.
- Analyze emails for legal or compliance reasons.
- Arrange your emails based on various filters and formulas.
- Share required emails with Non-Outlook Colleagues
All of this information is stored inside a PST file in Outlook, but Microsoft Excel is considered as a more convenient place to work with large amounts of email data.
Excel lets you to;
- Arrange emails by date, sender, subject etc.
- Instantly filter records.
- Use PivotTables and charts.
- Analyze data.
- Share structured reports with your team members.
For these advantages, many users convert their PST files to a format that is compatible with Excel to easily open and analyse your PST emails.
Choosing the Correct Conversion Method
There are two common methods to import PST data into Excel:
Method 1: Manual Method (Using MS Outlook)
If you have Outlook installed in your computer and need to export a small amount of mailbox data, Outlook has a built-in export feature that allows you to save emails as a CSV file that you can easily open in Excel spreadsheet.
It is good for basic needs but comes with some limitations, especially when it comes to multiple PST files, large mailboxes, or inaccessible data.
Method 2: Automatic PST Conversion
If you want to convert multiple PST files and need any special feature for this email migration from PST file to excel then a dedicated PST conversion tool is more recommended solution.
Now in the next section, we will discuss the manual Outlook method and detail each step of the process. We will also discuss the limitations of this method so that you can determine if it suits your needs before we move on to an automated solution.
Method 1. How to Import PST File to Excel Spreadsheet Manually Using Outlook
If you already have Microsoft Outlook installed on your computer, then you can use the Import/Export Wizard option in Outlook. It allows you to export mailbox data to a CSV file. You can open CSV file in Microsoft Excel to read and analyse your Outlook data in a spreadsheet.
This method is useful for users who want to export a single mailbox or any specific Outlook folders.
1. Run the Outlook desktop client application on your system.
2. Go to File tab in menu and click Open & Export and then import/Export.
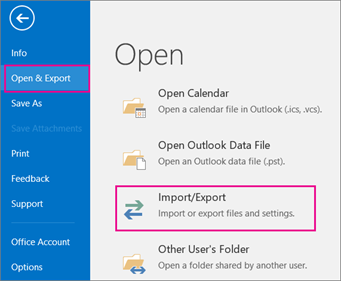
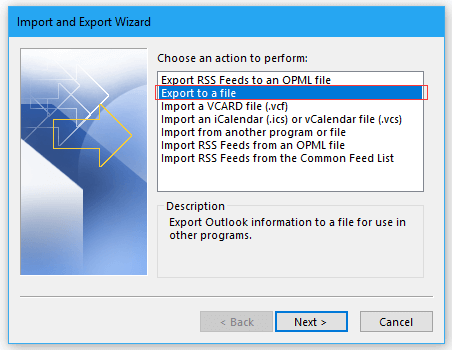
3. Choose Export to a file and click Next.
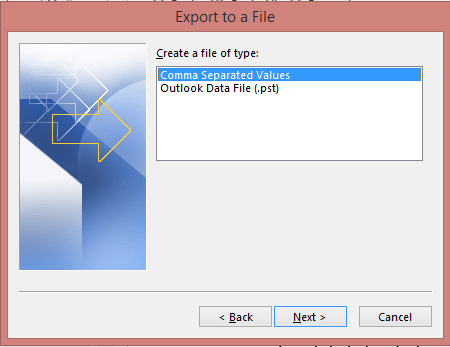
4. Select Comma-Separated Values (CSV) option from the list.
5. Select the folder to export and save the CSV file.
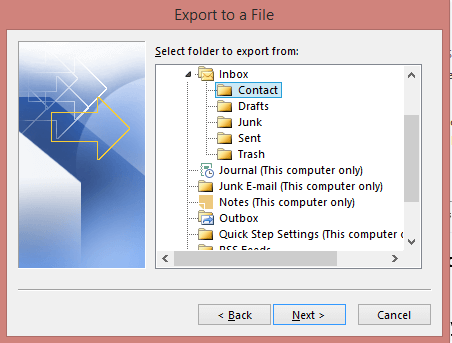
6. Browse the location to save your file, click Next to complete the process.
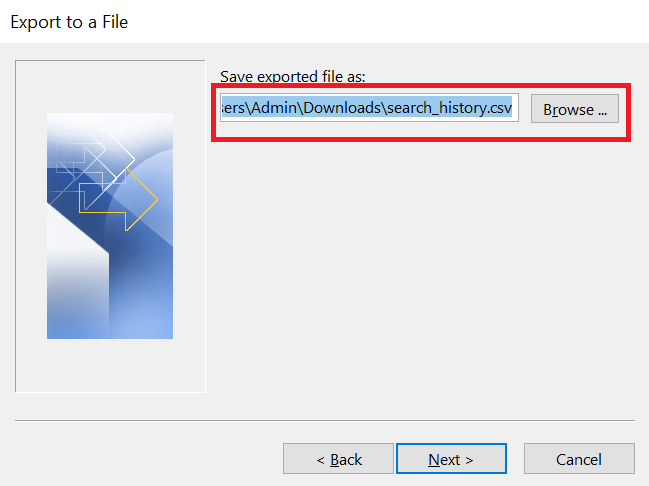
Now, locate the exported CSV file on your system.
Double click on it or:
- Launch Microsoft Excel.
- Click Open. Go to the CSV file.
- Drag it into Excel.
Your Outlook email information is now presented in rows and columns.
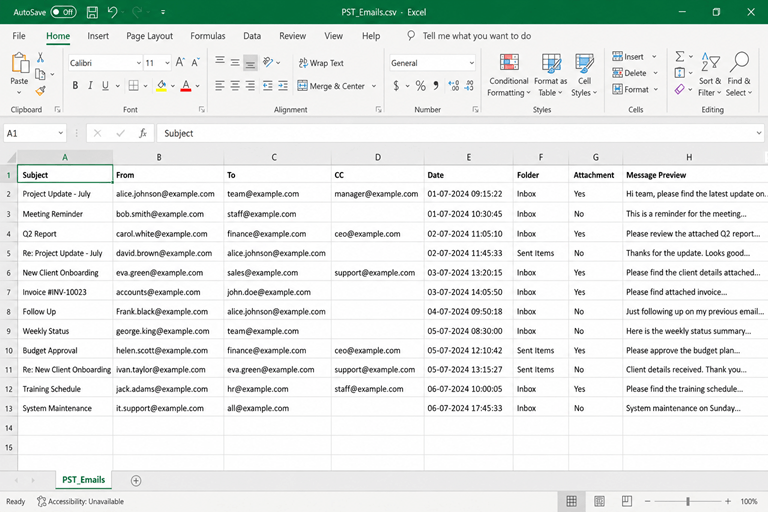
Is the Manual Method Right for You?
While Outlook’s export feature is convenient, it’s not suitable for all situations. Understanding their usage and what it can’t done will help you decide if it’s the right fit for your needs.
- PST file must be in a good condition, not corrupted or damaged. As, it is difficult to repair your PST file in outlook.
- Bulk conversion will take long time.
- Attachments are not exported along with your emails. It’s so because CSV stores text values only. Since email attachments are in binary files and Outlook exports only email and message content.
- Folder hierarchy isn’t preserved in the CSV file as all the email data is converted into a flat table.
Method 2. How to Convert PST File to Excel Professionally?
If the manual method using Outlook works for you, you can stop here. However, as we have seen in the previous section, it is not useful in certain situations. It needs Microsoft Outlook, doesn’t support bulk PST conversion and also not suitable for inaccessible or corrupted PST files.
A specialized PST conversion tool can make the conversion process workable for you. One such software is Advik PST Converter that converts Outlook PST files to multiple file formats like CSV, which can be easily opened and edited by Microsoft Excel.
Unlike the manual approach, the software allows you to convert one or multiple PST files directly. And, also it will convert complete PST into CSV file data along with all attachments in a separate folder.
Let’s check this tool open your PST file in Excel;

Note: With this demo edition, you will get to transfer the first 25 emails from each PST mailbox folder to Excel Spreadsheet for FREE. So, try it now!
Steps to Import PST to Excel Spreadsheet
Step 1. Run the software and click Select File.
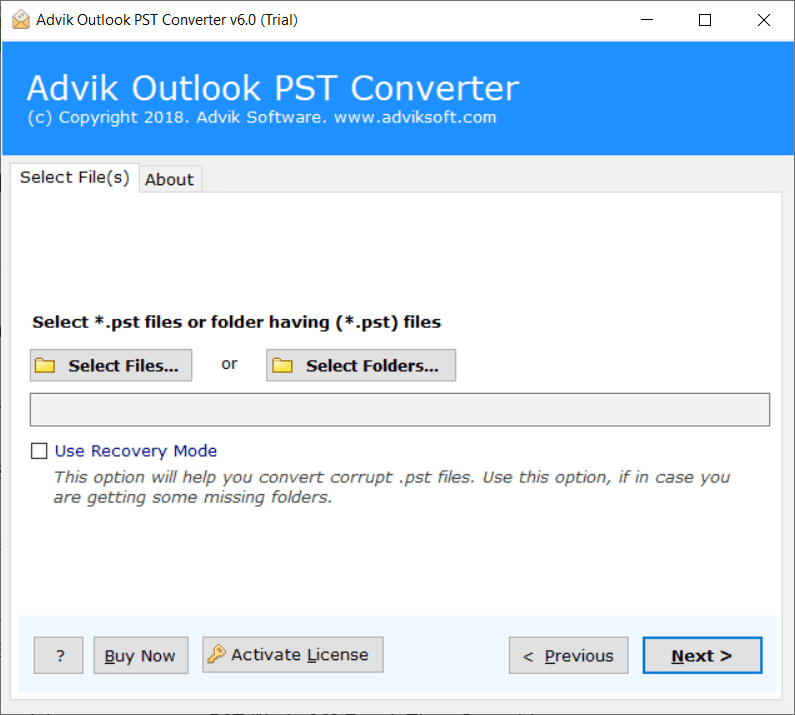
Step 2. Browse and add Outlook .pst file into the software.
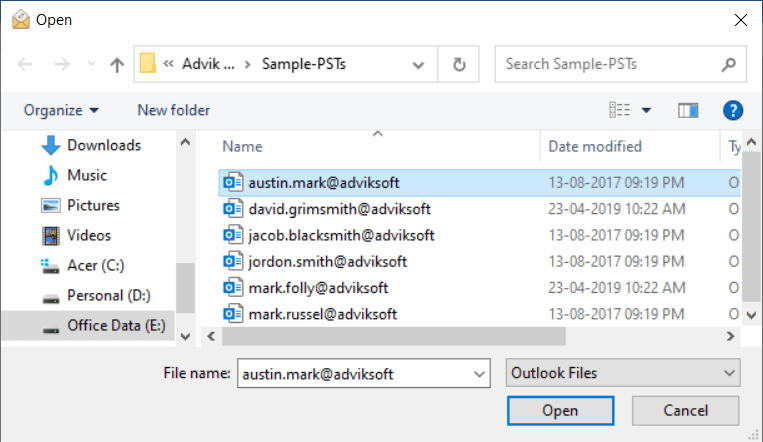
Step 3. Choose mailbox folders and click Next.
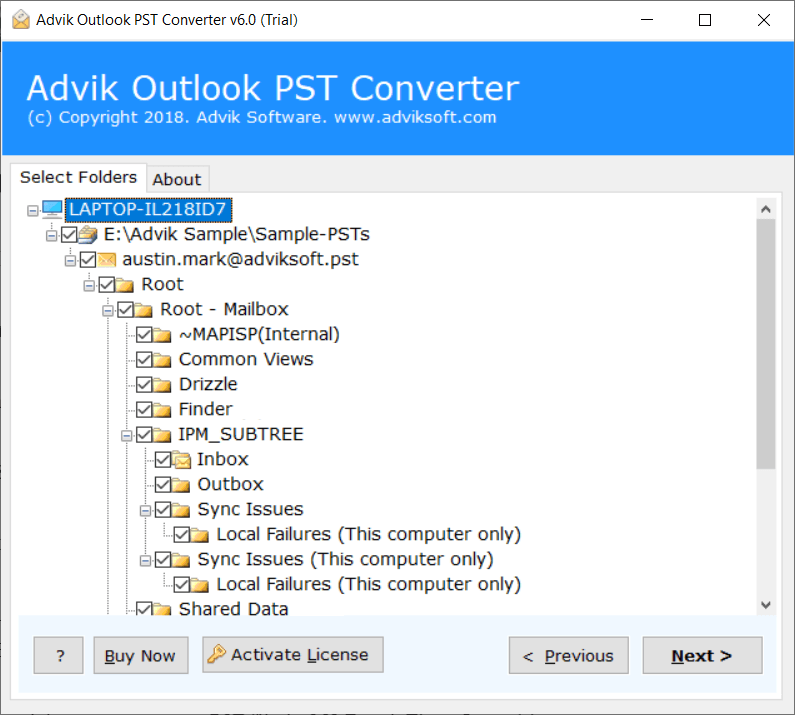
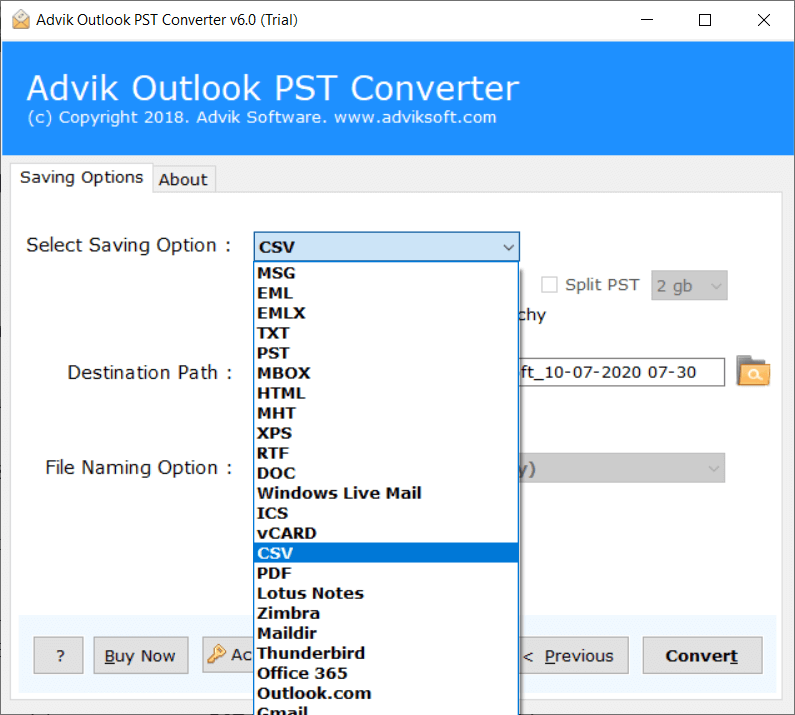
Step 4. Choose CSV as a saving option from the menu.
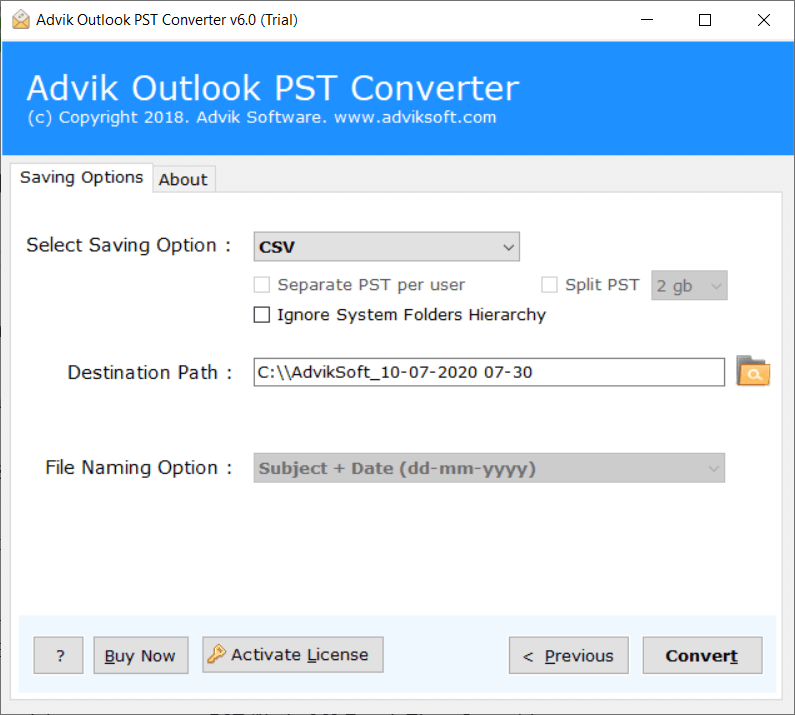
Step 5. Select the output target location and click Convert.
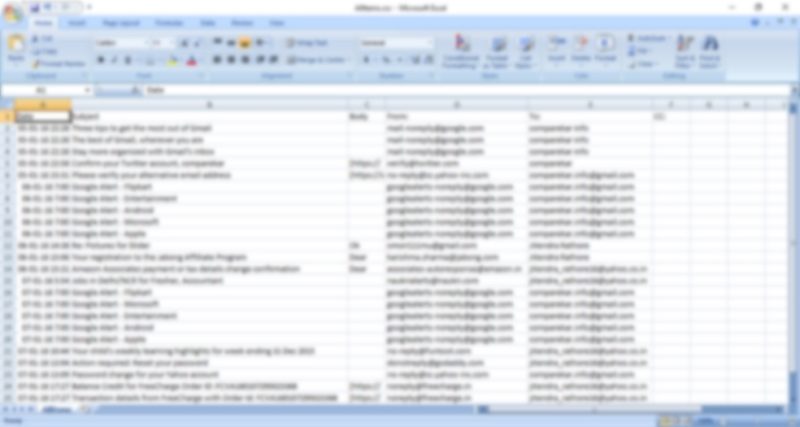
Finished! After the successful conversion of PST to CSV file format. You can open CSV file in Excel sheet.
Why Does the Software Convert PST to CSV Instead of XLSX?
Many users wonder why most PST conversion tools export to CSV and not an Excel workbook (.xlsx).
The answer is very simple.
Microsoft Excel can work with a variety of spreadsheet formats, but CSV is the common text-based format that brings structured data into Excel, Google Sheets, databases, and many other apps.
Open a CSV file in Excel and you’ll see all the email records are automatically sorted into rows and columns which allows you to;
- Filter Emails by Sender or Subject
- Excel filter for filtering records
- Search for keywords
- Build PivotTables
- Create reports
- Export to XLSX (if required)
To put it simply, PST to CSV conversion is the most widely used and compatible method to work with Outlook email data in Excel.
Tip: If you prefer an Excel workbook (.xlsx) instead, simply open the exported CSV file in Excel and select File >> Save As >> Excel Workbook (.xlsx).
Watch How to Transfer PST Files into Excel Sheet
Key Benefits of Using Advik PST Converter
- Batch PST to Excel Conversion Options: The software has two options to uplaod PST file into the software. You can select files or select folders to load PST files from your computer.
- Import Corrupted PST file: This application can transfer email data from a corrupted PST file to Excel. So that users can easily import inaccessible PST email data.
- Save Resultant Data at User Location: You can choose any destination path to save the resultant data files. By default, files are saved in a separate folder on the Desktop, but you can change this to any location.
- Keep Email Properties: The software keeps all email properties intact during conversion, including email text, subject, addresses, and hyperlinks.
- Simple & Consistent User Interface: The software has a simple and easy-to-understand interface, suitable for both technical and non-technical users.
- Supports all Microsoft Windows OS: The software supports all editions of Microsoft Windows operating systems, including Windows OS (Version 11, 10, 8.1, 8, 7) & Windows Server (2019, 2016, 2012, 2008), etc.
Manual Method or Advik PST Converter – Which One Should You Choose?
There are two methods to open pst file in Excel, manual Outlook method and automated PST converter. The right choice depends on various factors on your needs like mailbox size, number of PST files etc.
Here’s a comparison that makes the main differences clear. Understand them and take your decision as per your analysis of both the methods.
| Feature | Manual Method | Advik PST Converter |
|---|---|---|
| Requires Microsoft Outlook | Yes | No |
| Converts Multiple PST Files | One at a time | Yes |
| Supports Bulk Conversion | Limited | Yes |
| Opens Corrupted or Inaccessible PST* | Limited | Designed to handle inaccessible PST files |
| Folder Selection | Yes | Yes |
| Time Required for Large Mailboxes | Longer | Fast as compared to Manual Method |
Conclusion
Now, we have understood that Microsoft Excel cannot open Outlook PST files directly. The mailbox needs to be exported or converted to a supported format such as CSV first. If you already have Microsoft Outlook installed and just want to export a single mailbox or a handful of folders then the built-in Export Wizard is an easy and free solution.
But, if you are working with multiple PST files, large mailboxes, unavailable data or do not have Outlook installed, a dedicated PST conversion tool offers a more practical solution. It will be easy to convert, save time and gives more options for bulk data export.
Choose the method that best suits your needs. Once your PST data is converted into CSV file, you can open it with Microsoft Excel to analyse and organise your email information or also you can it as an Excel Workbook (.xlsx).
Frequently Asked Questions
Q1. Is it possible to open PST file in for Microsoft Excel directly?
Ans. No, Microsoft Excel cannot open Outlook PST files. It’s so because PST is a native file format of Microsoft Outlook. To open PST data in Excel, you have to export or convert the mailbox to CSV first. After that, you can open CSV file in Excel and view you data in rows and columns.
Q2. Why should I convert PST to CSV instead of XLSX?
Ans. The most common format to transfer structured data between applications is CSV. Microsoft Outlook exports mailbox data to CSV because it can be used in Excel, Google Sheets and other spreadsheet applications. You can open Outlook email data in Excel workbook (.xlsx) with just CSV file. You just need to open the CSV file in Excel and save it as Excel Workbook in .xlsx format.
Q3. Do I need to install Outlook to export PST data to Excel?
Ans. Yes if you are using the manual method. If you want to export mailbox data from PST file to CSV, you need to use Outlook’s Import and Export Wizard. If you don’t have Outlook installed or it’s impossible to open the PST file in Outlook, you’ll need an alternative PST conversion solution.
Q4. Will my email attachments be in Excel after conversion?
Ans. No. CSV files only have text based information and there is no way to insert email attachments in an Excel spreadsheet. Only email information such as sender, recipient, subject, date and message content is exported. To get attachments along with email data to CSV and save attachments separately, you can use any professional method.
Q5. How to convert multiple PST files to Excel at once?
Ans. The built-in Outlook export feature handles one mailbox at a time. If you are looking to convert multiple PST files then you will have to repeat the export process manually for every file. Also, you can use any professional method to convert multiple PST files to Excel at once.