How to Import PST to Office 365 Account: Top 3 Methods
You can migrate your emails from PST file to Office 365 either manually using Outlook or with the help of Microsoft Network Upload function. However, after a recent migration I noticed that both approaches have many issues especially when dealing with huge PST files. The Outlook technique was slow for big data and the Network Upload process involved several technical steps like generating SAS URL, using AzCopy and setting up CSV mapping files. In some circumstances, the import procedure even stopped or failed during validation.
I tried numerous ways to import PST to Office 365 mailboxes to make the transfer succeed. In addition to manual approaches, I also used a professional PST to Office 365 migration tool which made the entire process more easier and minimized the risks of errors. In this article, I will discuss all the ways that I tested to move Outlook PST emails to Microsoft 365 mailboxes. Go through each one of them and choose the best solution that fits your needs and requirements.
PST file is a file used by MS Outlook. It stores mailbox data including emails, contacts, calendars, notes and many more. Microsoft Office 365 is cloud-based email service and has the benefits such as enhanced security, access from anywhere and interaction with Microsoft programs. In general, consumers seek to move emails from PST to Office 365 to run their business and to fully exploit the Microsoft 365.
Table of Contents
- Advantages of PST to Office 365 Migration
- Import PST to Office 365 Using Outlook
- Migrate Outlook PST File to Office 365 Using Network Upload Method
- Import PST File to Outlook 365
- Steps to Upload PST File to Microsoft 365
- Video Tutorial
- Comparison Table Manual Vs Automated
- Final Thoughts
- Frequently Asked Questions
Benefits of PST to Office 365 Migration
Some of the primary benefits of importing PST email into Microsoft 365 are:
- It enables you to quickly reach your emails, contacts and calendar from any internet connection device.
- Multi-factor authentication, encryption and threat protection of Office 365 provides extra layer of security.
- It provides powerful search capabilities to easily search emails, contacts, attachments and calendar items without manually opening up Outlook data files.
- Importing PST files to Microsoft 365 means the mailbox data will be stored on the Microsoft cloud servers. It is useful in recovering emails in case of unintentional deletion, system failure or hardware breakdowns.
- You can use Microsoft 365 collaboration tools such as Microsoft Teams, OneDrive, and SharePoint.
How to Import PST to Office 365 Using Outlook?
Follow the below given steps to open PST file in Office 365 using Outlook email client:
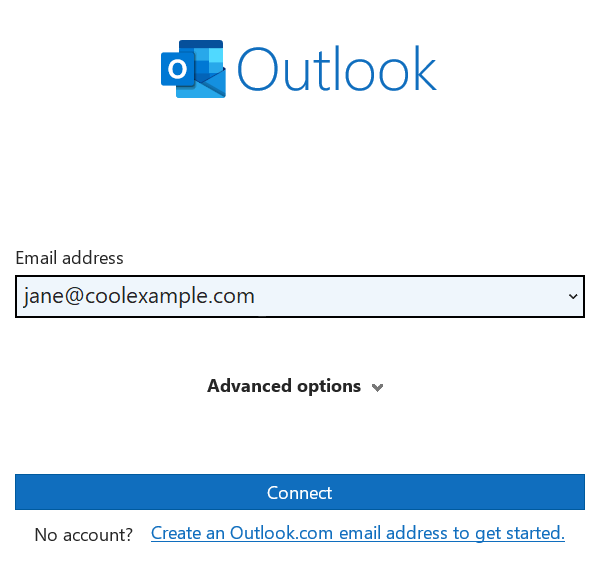
- Click on File and choose Add Account.
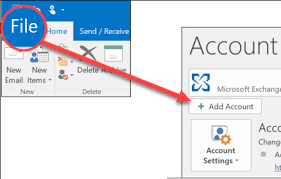
- Enter your Office 365 webmail account and click Connect.
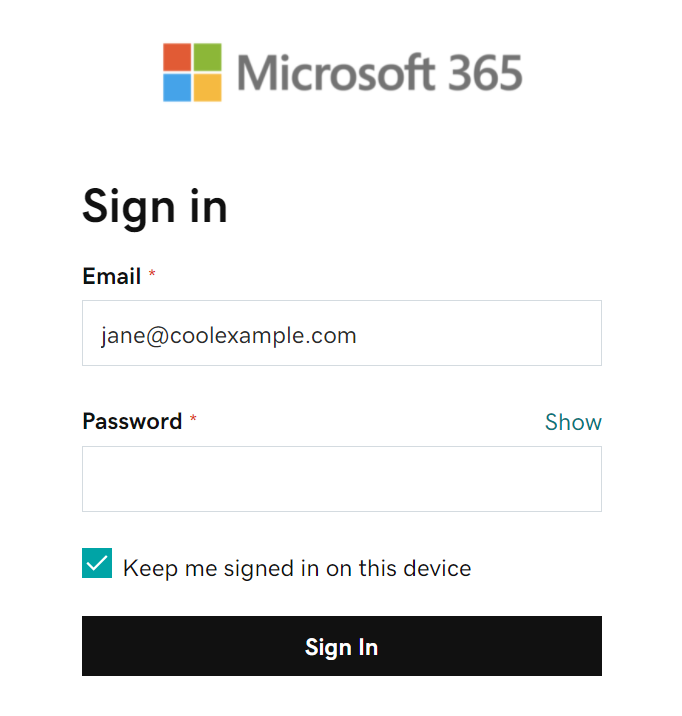
- Type in the password for your Microsoft 365 account and click Sign In.
- Follow the instructions to set up your account and click OK when you’re done.

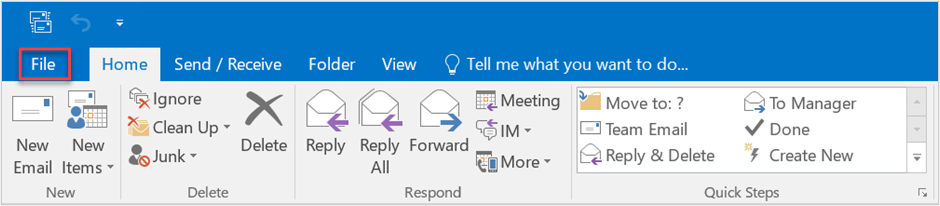
- Again, open Outlook on your computer and go to File.
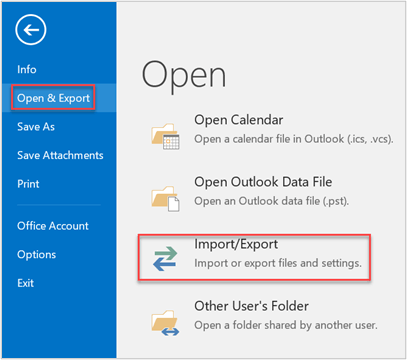
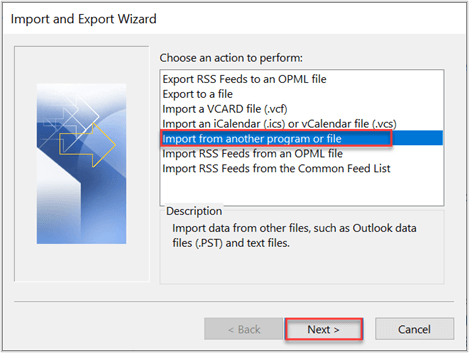
- Click Import/Export to open the Import and Export Wizard.
- Choose Import from another program or file and click Next.
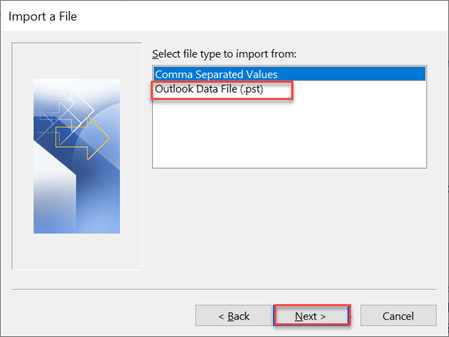
- Select Outlook Data File (.pst) and click Next.
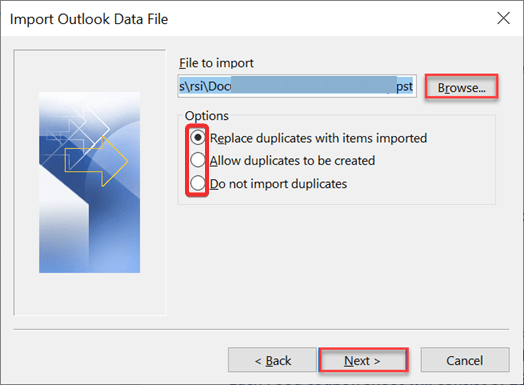
- Click browse to find the PST file select options; click Open.
- Choose the folders of PST files and click Finish.
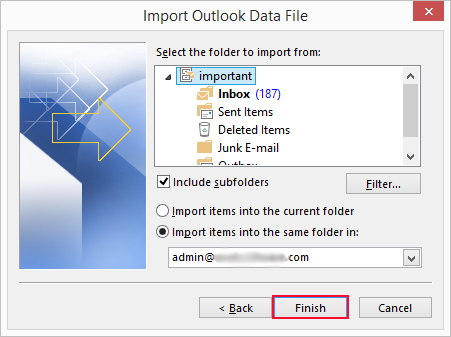
Finished!! You just need to follow these simple steps to import Outlook data file to Office 365 webmail account directly.
How to Upload PST File to Office 365 Using Network Upload Method?
This method is offered by Microsoft itself to help administrators open PST file in Office 365 account. However, the whole method is lengthy and complex, which is why we have divided it into 4 major steps to ease the whole process.
Before proceeding with this method, you have to be assigned the Mailbox Import Export role in Exchange Online to create import jobs
Step 1. Create a SAS URL
The SAS URL is used to temporarily store PST files in Azure Blob Storage before importing them into Office 365.
- Sign in to your Office 365 account and go to the Compliance Center.
- Data Lifecycle Management > Microsoft Purview.
- Click “Import” in the Data Lifecycle Management Overview section.
- Click +New Import Job and give the job a name.
- Select Upload your data > Next.
- Select Show network upload SAS URL to generate the SAS URL.
- Copy the SAS URL to use in later procedures.
Step 2. Download and Use the Azure AzCopy Utility
Upload PST files to Azure Blob Storage using the Azure AzCopy command-line tool.
- Go to the official Microsoft website and download AzCopy depending on your system needs.
- Unzip the ZIP you downloaded to receive the executable.
- Open command prompt and run the following command to change the directory where the executable file of AzCopy is located. cd <Path-to-AzCopy>
- To upload PST files to Azure Blob Storage, perform the following command: azcopy.exe copy “<Local-PST-File-Path>” “<SAS-URL>” –recursive=true
- Replace <Local-PST-File-Path> with the path to your PST files and <SAS-URL> with the produced SAS URL.
- Once the upload is finished, return to the Compliance Center and select I’m done uploading.
Step 3. Build and Upload the Mapping File
The mapping file instructs the system which PST files will be imported into which Office 365 mailboxes.
- Download the PST import mapping file template from Microsoft’s official link.
- Open template in Microsoft Excel.
- Fill in the details needed like:
Workload: Please use “Exchange”.
FilePath : PST file path in azure blob storage.
Mailbox – Email address of the target Office 365 mailbox.
IsArchive: TRUE for archive mailboxes and FALSE for primary mailboxes. - Click File > Save As, and choose CSV UTF-8 (Comma Delimited).
- Back to compliance centre Office 365
- Select Upload File in the Import Data area to upload the CSV file.
- Click Validate to validate the mapping file. Click Next on successful validation.
Step 4. Import Job Filter and Submit
You can filter the data that you wish to import, or import everything as you like.
- In the Import Data window, select the PST files you uploaded.
- Import filtered data or import all. Your choice.
- Click Submit to begin the import process.
- You will see a message telling you the size of the PST file you are importing.
- Wait for the PST analysis to complete. The process may take a few hours depending on the size of the file.
- Once done, you’ll receive a success notification.
Office 365 import PST process complete!
How to Migrate Outlook PST Emails to Office 365 Automatically?
If you want a simple and direct solution to import PST to Office 365 Webmail account then try the Advik PST Converter. This software is able to directly upload PST files to Office 365 in just a few simple clicks. The tool will maintain folder hierarchy and email attributes in the same format during the PST to Office 365 migration. It can bulk import PST to Office 365.
Click below to download this software for free.


Note: The freeware or trial edition will migrate 25 emails for free.
Steps to Import Emails from PST File to Office 365 Webmail
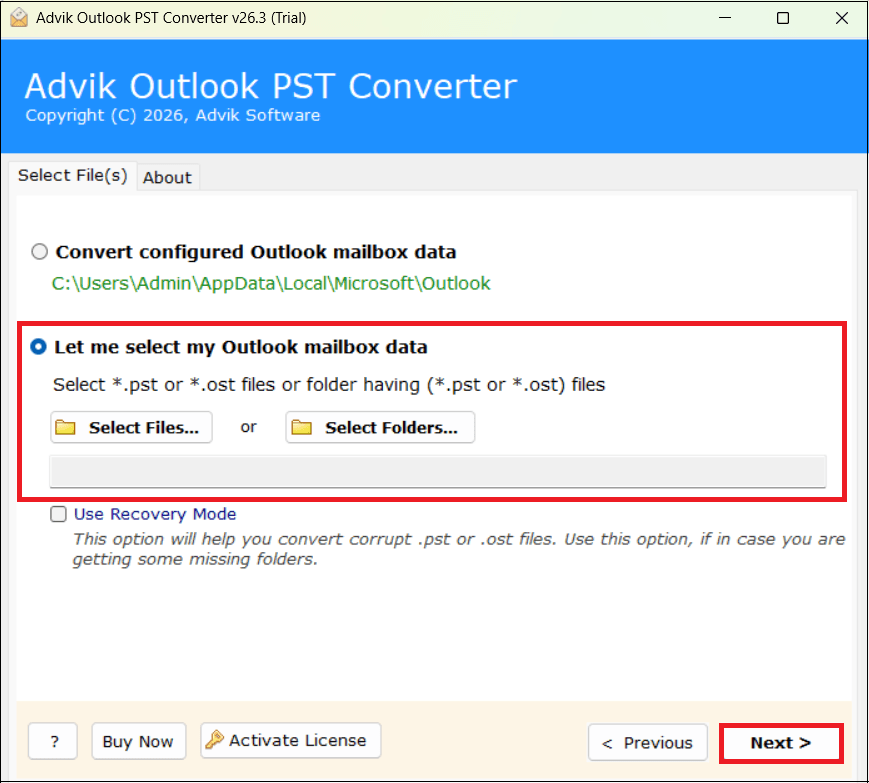
1. Run PST to Office 365 Import Tool and click Select Files to add PST file.
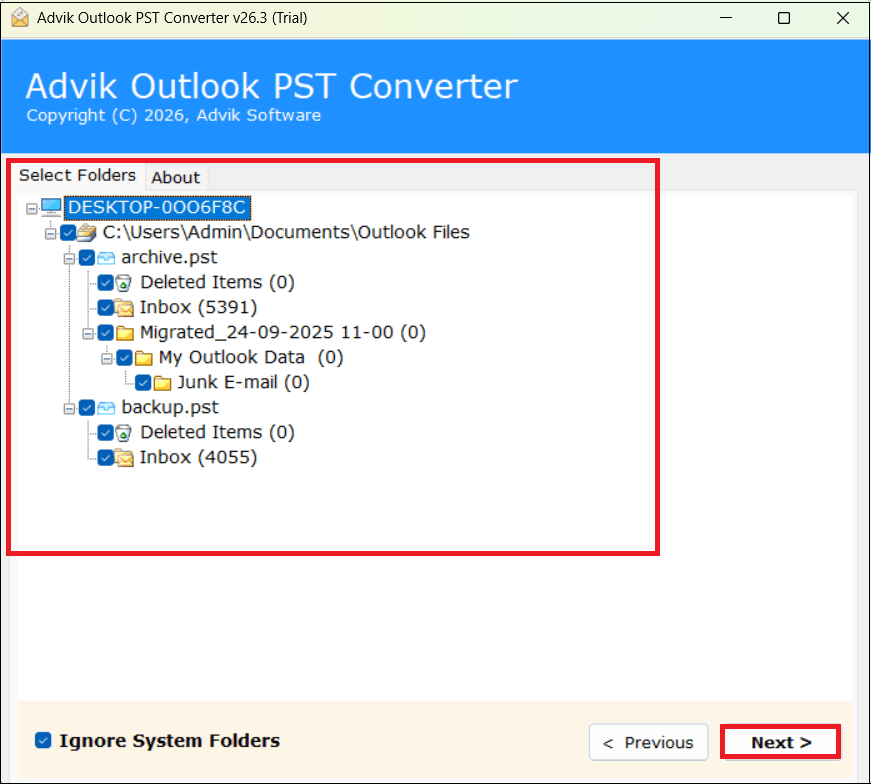
2. Select mailbox folders that you need to import and then press Next.
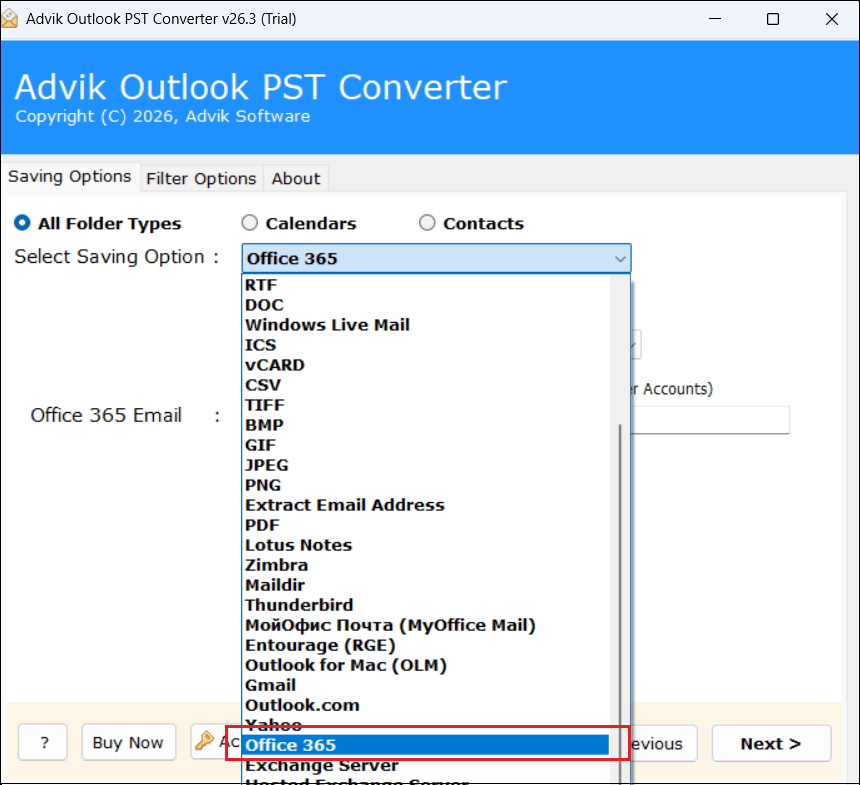
3. Choose Office 365 from the given list of Select Saving Option.
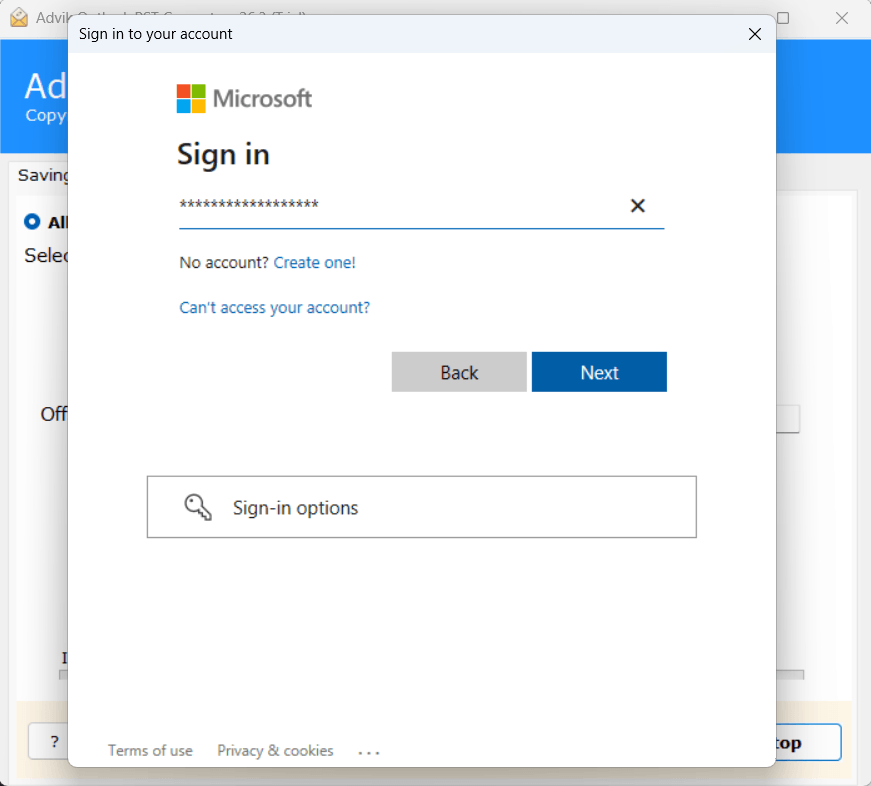
4. After that, enter your Office 365 account login details in respective field.
5. Finally, click Convert button to start the importing process.
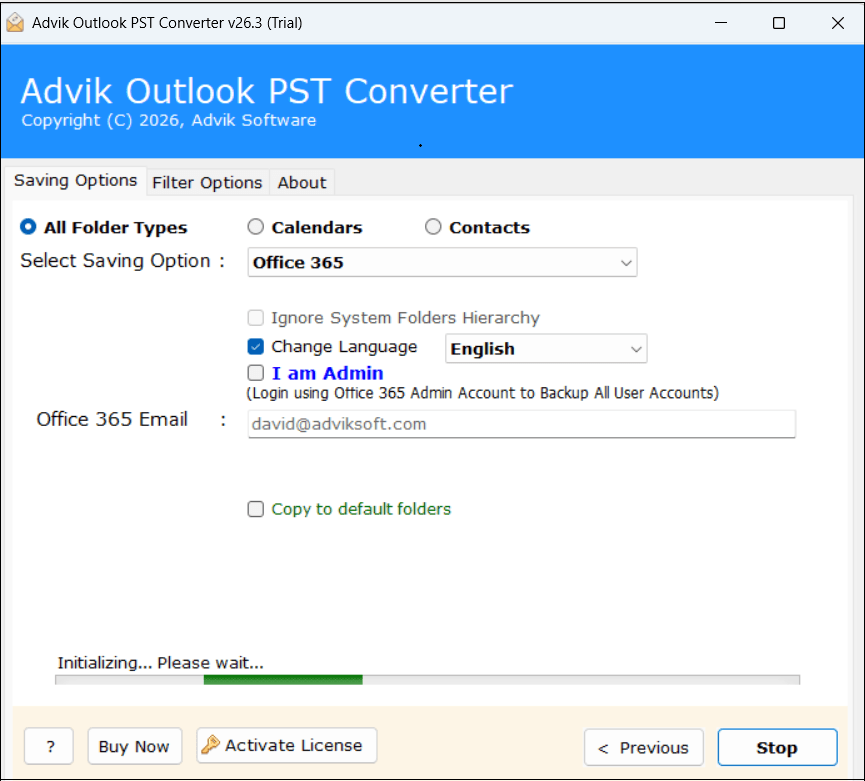
Done!! The software will start transferring emails from PST into Office 365 automatically. Once done, open your Office 365 Webmail account and find your emails in the AdvikSoft Label folder.
Watch How Office 365 Import PST Files
In addition, the software does more than that. Below are the additional benefits you will get from this Office 365 to PST import tool.
- A standalone utility that can directly import PST file to Office 365 mailbox.
- Upload PST files with complete mailbox folder items.
- Import large PST to Office 365 without any size or quantity limits.
- Let’s you select specific folders for the import process.
- Automatically adds PST files or lets you browse and add from any location.
- Offers advanced filters to import PST email to Office 365 selectively.
- Fully Automated and user-friendly PST to Office 365 migration tool.
- It works well with all versions of MS Outlook and Windows OS.
Comparison Table: Manual versus Professional Solution
| Features | Manual Method | Professional Method |
|---|---|---|
| Ease of Use | Technical knowledge needed | Easy to use with step-by-step guidance |
| Time Needed | Time-consuming | Faster, particularly for large PST files |
| Accuracy | Error prone | High accuracy |
| Data Integrity | Risk of data loss or corruption | Preserves data integrity |
| Batch Processing | Limited | Multiple PST files Support |
Concluding Words
This is the end of the blog with 3 different solutions to attach PST file to Outlook 365. We hope that we were able to provide you with the best approaches to import PST to Office 365 account. You can use any of these methods as per your needs and convenience. However, two of them are a bit lengthy and require some technical assistance. Hence, it is advised to choose only if you have the proper knowledge to avoid data loss.
Frequently Asked Questions (FAQs)
Q1. Can I import PST file to Office 365 mailbox without Outlook?
Ans. Yes, there is no need to use Outlook or any other external application to import Outlook PST to Office 365 account. The software is a self-describing utility that doesn’t require the support of any other.
Q2. Is it possible to migrate PST Contacts along with Emails to Office 365?
Ans. Of course, with the help of this tool, you can import PST contacts to Office 365 account in just few simple steps.
Q3. I have multiple PST files to import into Office 365, Can I do this with this tool?
Ans. Yes, the program has dual options to import PST files to Office 365 in batch.
Q4. Is it possible to transfer only specific emails and exclude unwanted emails?
Ans. Yes, the software has an option for Advanced Filter. You can apply email filters according to your requirements.
Q5. What are the limitations of PST migration in Office 365?
Ans. You can upload and import PST files up to 20 GB. Moreover, you need lots of permissions to complete the import process.
Related Articles