How to Export PST from Office 365 Admin Center? Explore 3 Different Ways!
If you’re a Microsoft 365 admin, you can export mailbox data to PST through Microsoft Purview eDiscovery. If you’re an individual user with Outlook, you can export your own mailbox from new or classic Outlook for Windows. And, if you don’t have Outlook or need to export multiple mailboxes, a dedicated Microsoft 365 backup tool can be an alternative.
Quick route: Admin >> Microsoft Purview eDiscovery | User with Outlook >> Outlook PST export | No Outlook/bulk backup >> dedicated Office 365 Backup Tool.

Testing note: Check the Microsoft 365/Purview and Outlook export paths against the current tenant UI before publishing, because Microsoft continues to update the eDiscovery and Outlook experiences.
Table of Contents
- What is included in the PST File?
- Check the PST after Export
- Common Problems and Fixes
- Conclusion
- Frequently Asked Questions
Admin, user, or neither? Pick your route
The right method depends mainly on who is exporting the mailbox and what access they have.
| Situation | Recommended Route | Admin Permissions | Outlook Required? | Multiple Mailboxes |
|---|---|---|---|---|
| Microsoft 365 admin exporting organizational mailbox data | Microsoft Purview eDiscovery | Yes | No | Yes, depending on case/search scope |
| User exporting their own Microsoft 365 mailbox | Outlook PST export | No special eDiscovery role | Yes | One account at a time |
| Admin/user without Outlook | Microsoft 365 backup software | Depends on product/account access | No | Depends on product |
Important: Microsoft 365 does not provide export to PST option in Microsoft 365 Admin Center. The Microsoft supported admin route is through the Microsoft Purview eDiscovery where search results can be exported as PST files.
Prerequisites Before Exporting Office 365 Mailboxes
Before you begin, you will need to:
- Required Permissions: Your account needs the eDiscovery Manager role with Content Search and Export permissions.
- Supported Microsoft 365 Licence: Your subscription must include Microsoft Purview and eDiscovery features.
- Microsoft Purview Access: Mailbox exports must be performed in Microsoft Purview compliance portal.
- Microsoft eDiscovery Export Tool: Needed to download the exported PST file.
- Stable Internet & Storage: A stable internet connection and sufficient storage space on your system are required, especially when exporting large mailboxes.
Large exports can take some time to process and require to split into multiple PST files depending on mailbox size.
Admin: Export Office 365 Mailbox to PST with Microsoft Purview eDiscovery
For an administrator looking to search and export mailbox content from Microsoft 365, Microsoft Purview eDiscovery is the way to go.
The eDiscovery experience today is not the same as the old Content Search workflow. Microsoft retired classic eDiscovery experiences, including classic Content Search and classic eDiscovery (Standard) on August 31, 2025. So, you should not follow the older instructions to open Content Search and run the old eDiscovery Export Tool or use the retired export workflow on a current Microsoft 365 tenant.
Require eDiscovery permissions?
Yes. To work with eDiscovery cases and searches, a user needs to be assigned a Microsoft Purview eDiscovery role.
Steps to Export Office 365 Mailboxes to PST
Follow these steps to export an Office 365 mailbox to a PST file using Microsoft Purview.
Step 1. Log in to the Microsoft 365 admin center with an administrator account.
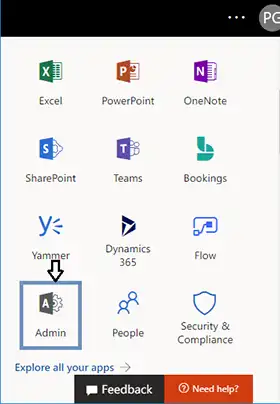
Step 2. If your account does not have the eDiscovery Manager role, make sure to assign the correct permissions before proceeding.
Step 3. You can do this by opening Microsoft Purview >> Settings >> Roles and scopes >> Role groups.
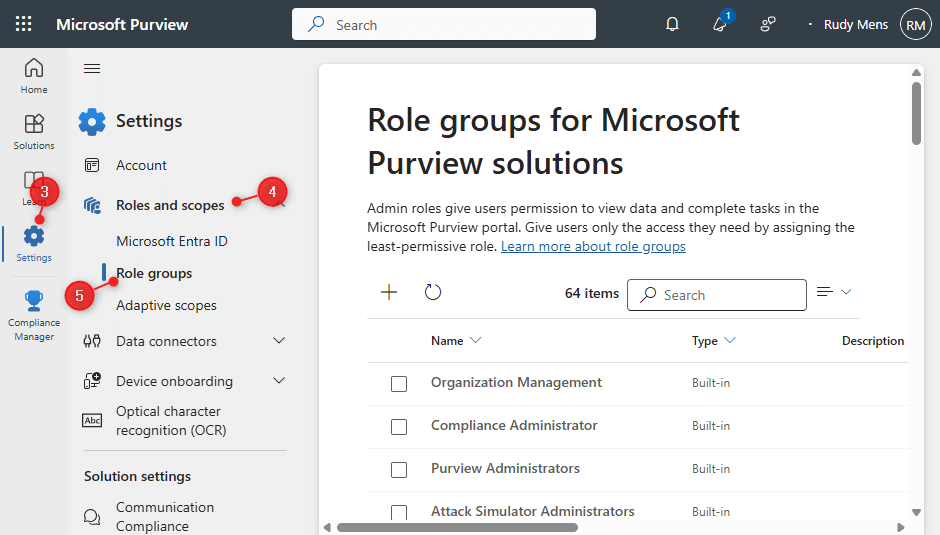
Step 4. Sign out and then sign in to activate the change after assigning the role.
Step 5. Open the Microsoft Purview portal from the Microsoft 365 Admin Center, or go directly to the Purview portal.
Step 6. Go to Solutions >> eDiscovery (Standard) and launch Content Search.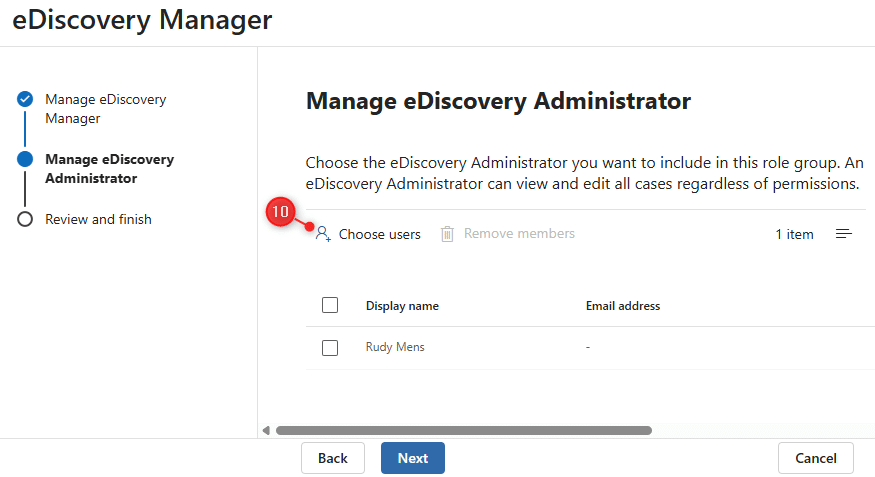
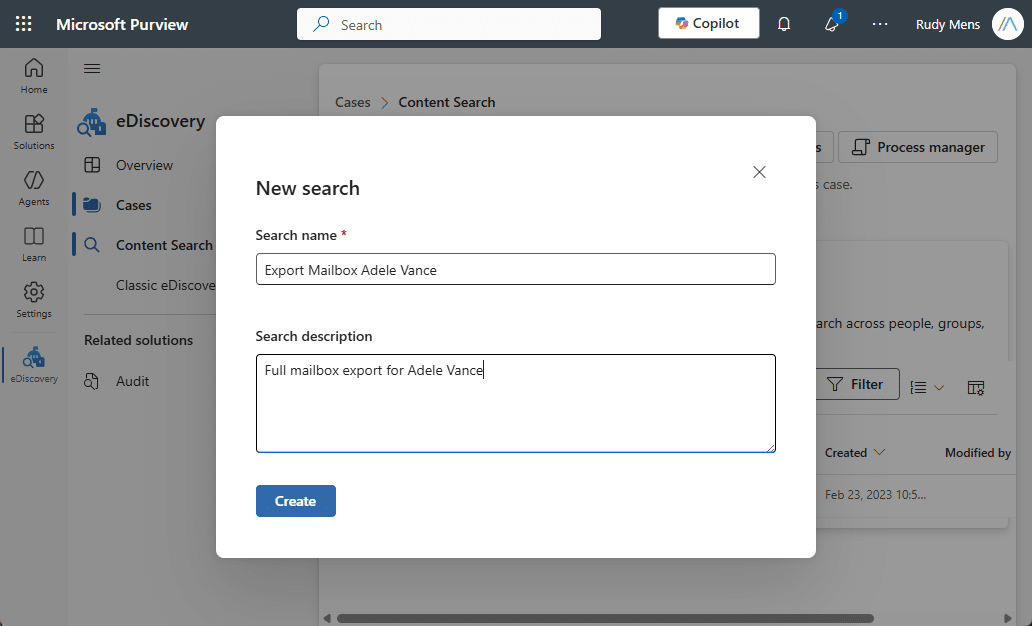
Step 7. Click Create a search, type in a meaningful name and description, and click Next.
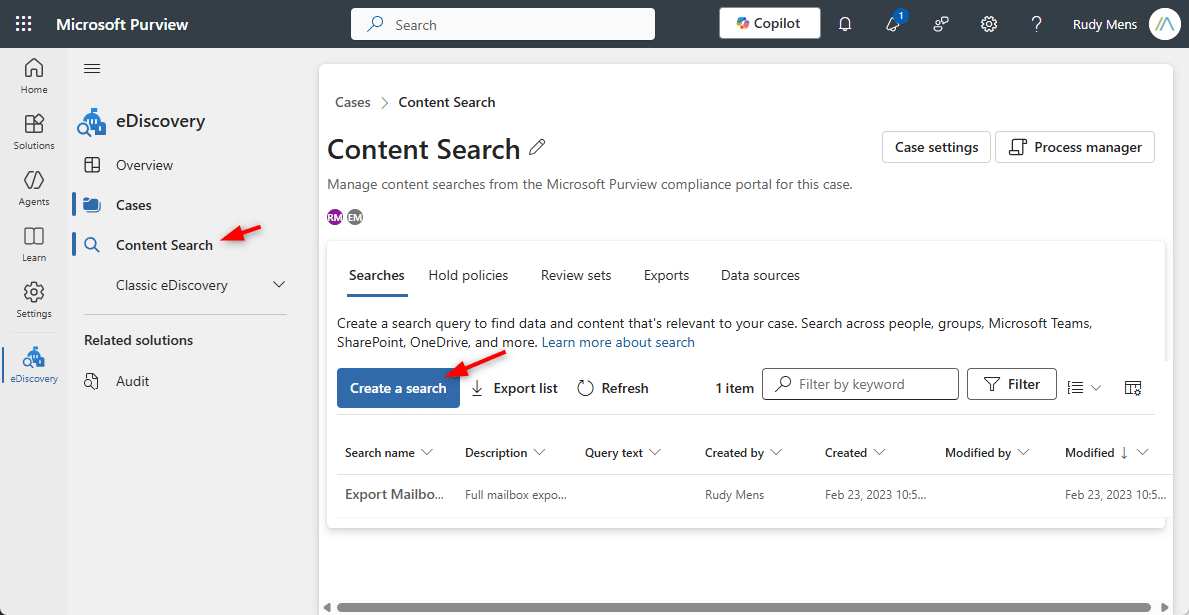
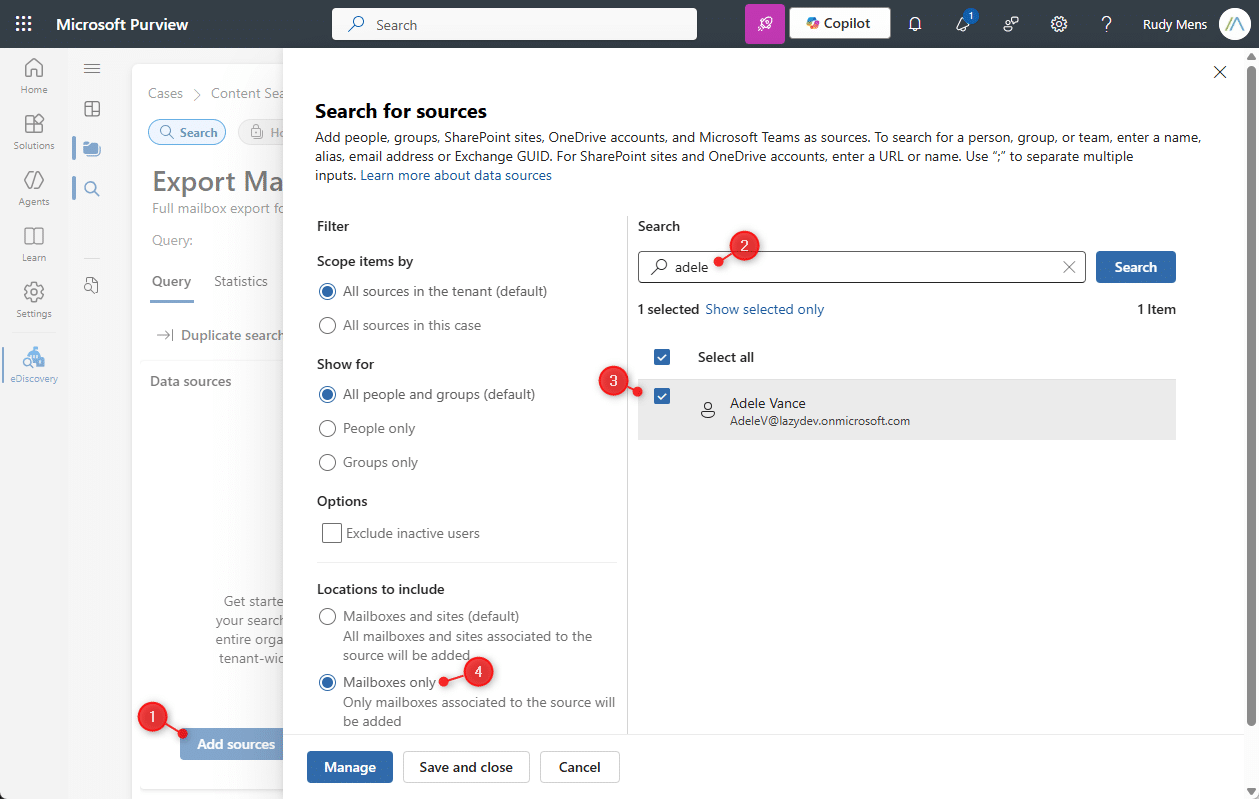
Step 8. Now, add the data source to the content search. To do this; Click Add Sources >> Search for the mailbox you want to export >> Select the user. For the Content location, select Mailboxes only then Click Manage and Save. If needed, you can select multiple mailboxes as well.
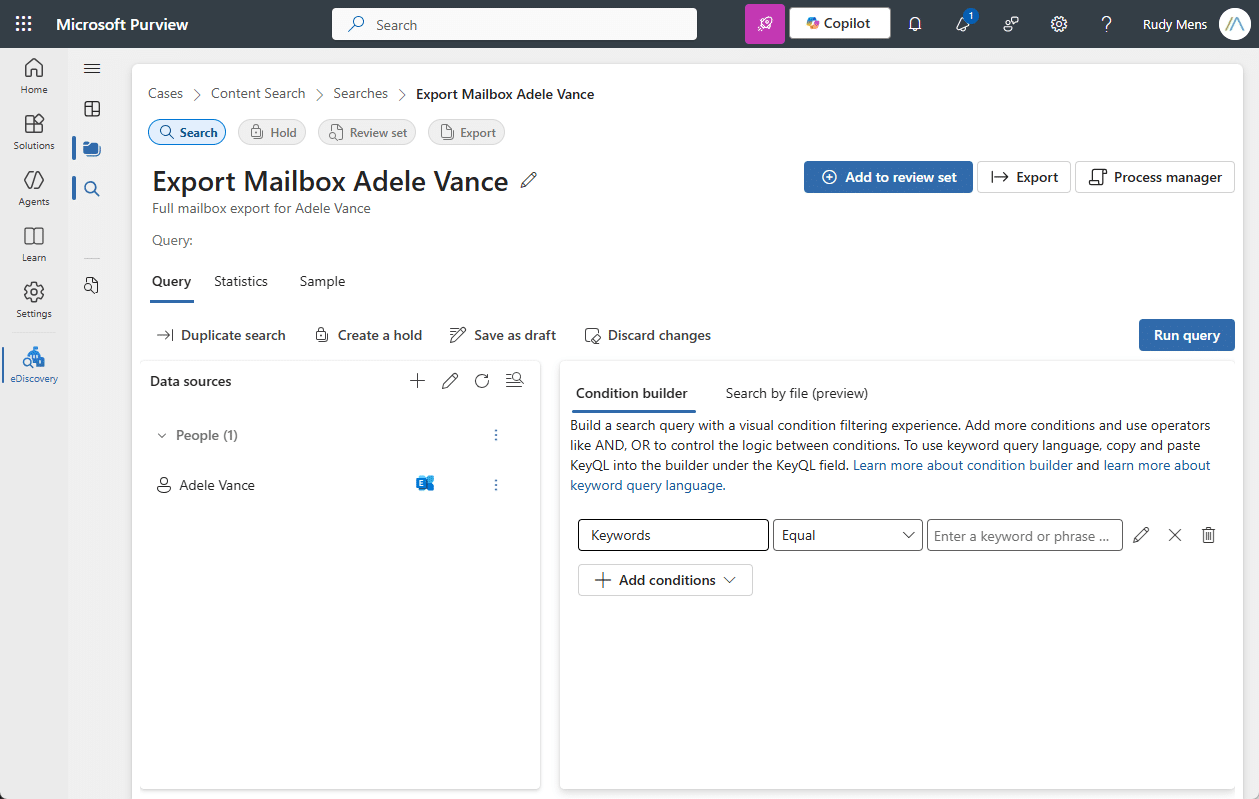
Step 9. If you want to export the entire mailbox, leave the Conditions section blank. Or, you can export specific mailbox data by using filters such as sender, recipient, keywords, subject, or date range.
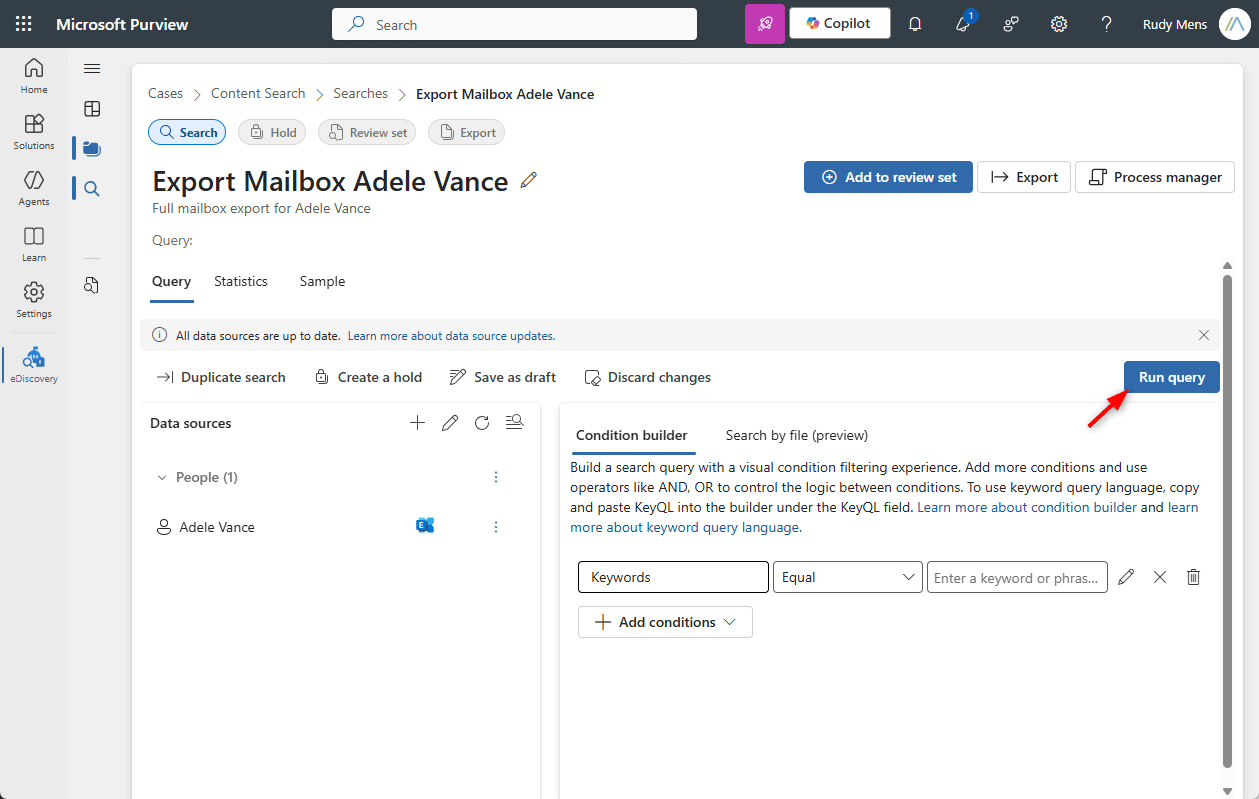
Step 10. Select the default Statistics option, then click Run Content Search. Wait for Microsoft to finish searching the content.
Step 11. Wait for the search to complete, and when the search completes, review the search summary to verify the mailbox data.
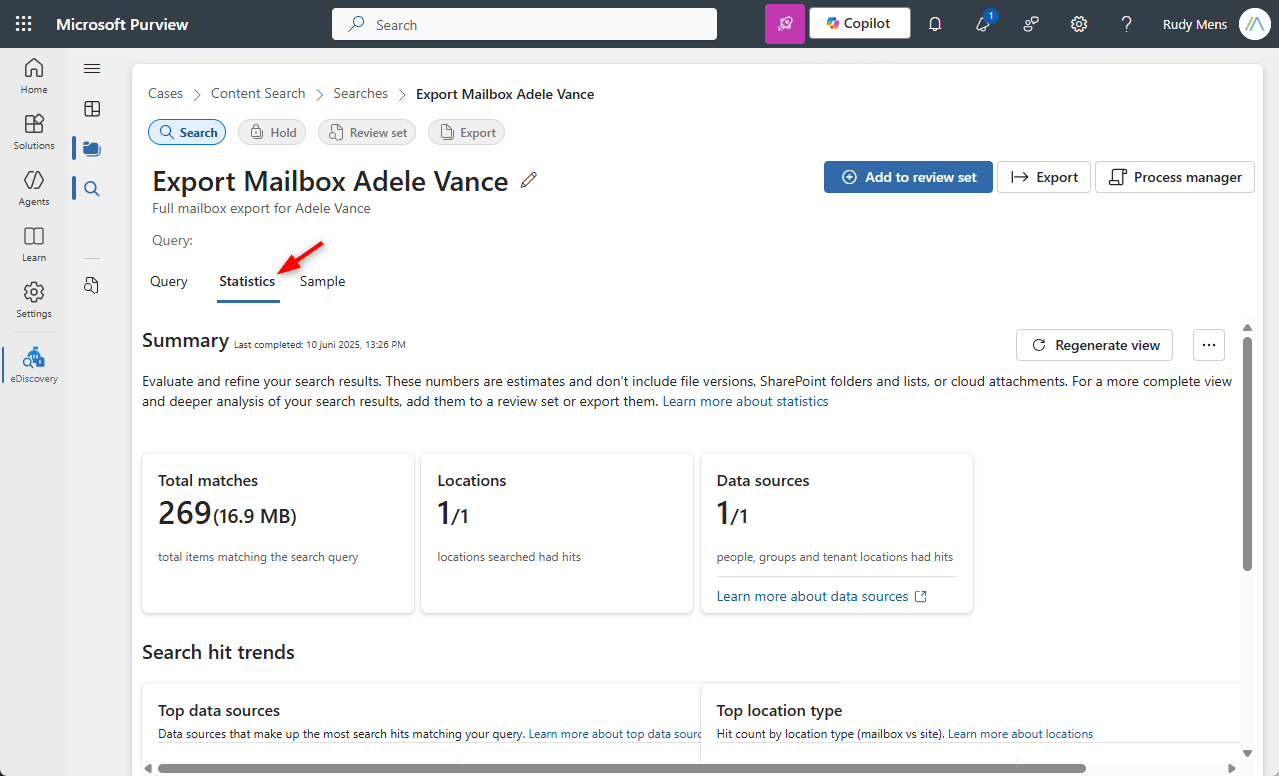
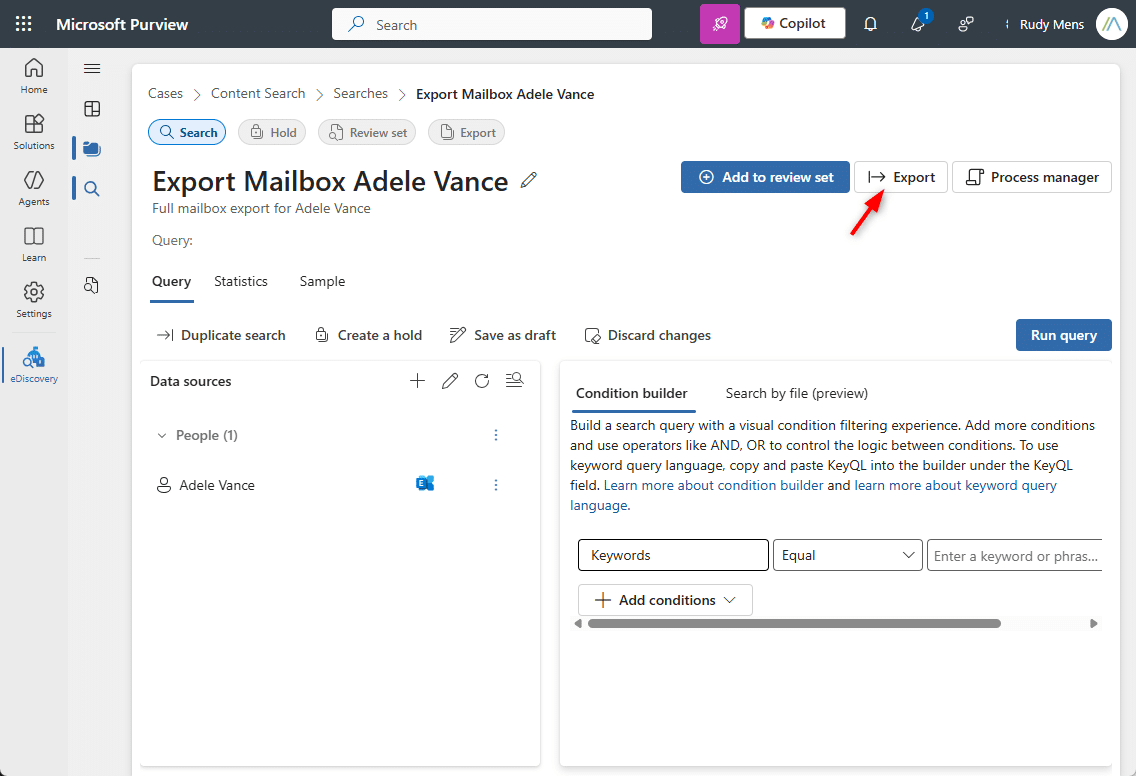
Step 12. Once the search is complete then export the results. To do this, Open the completed content search that we have created above and click ‘Export’.
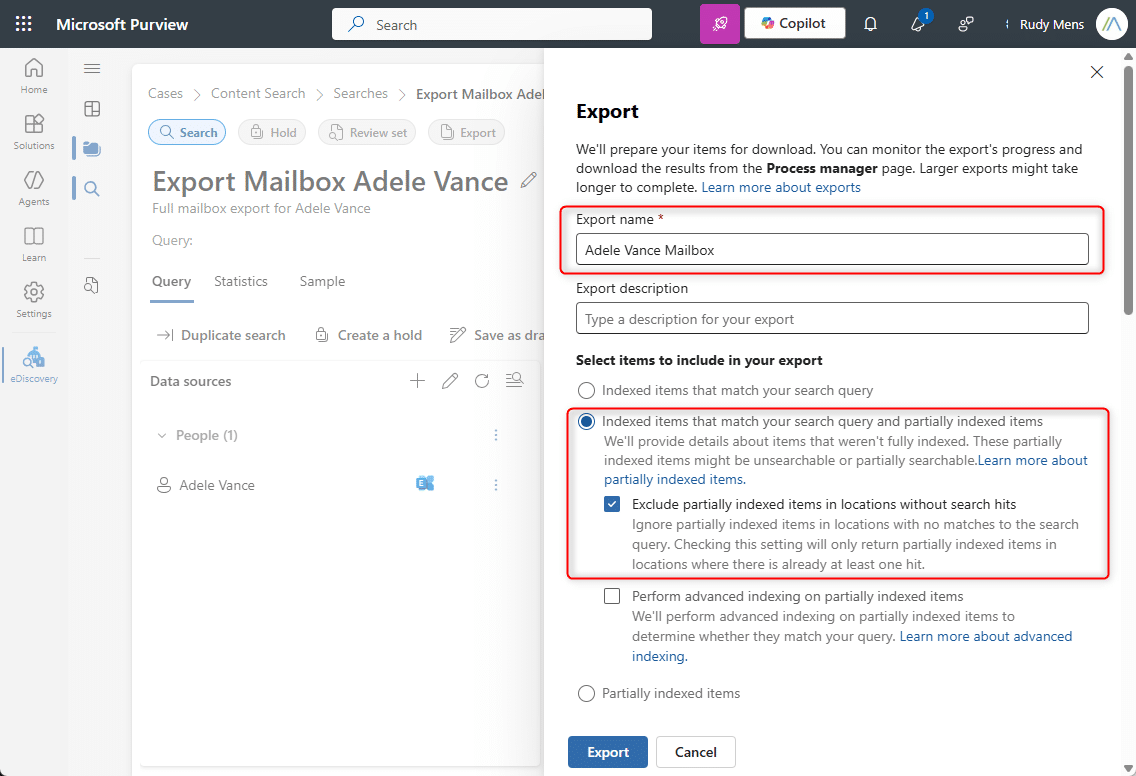
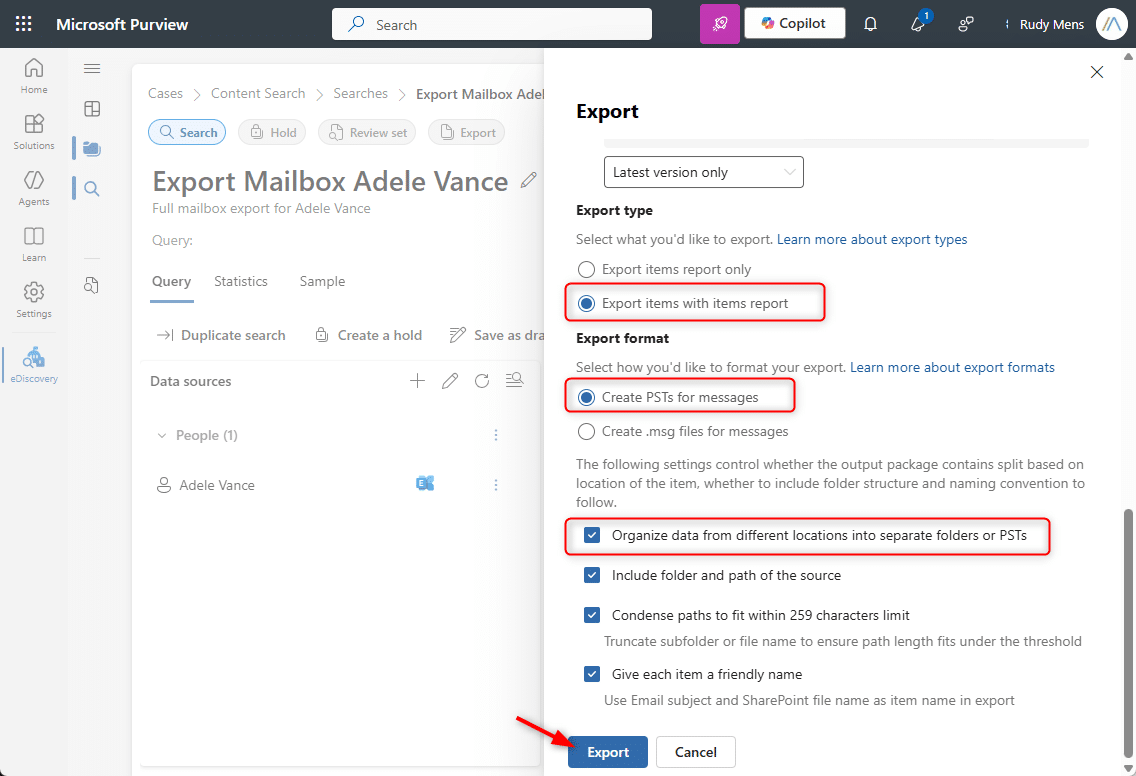
Step 13. After that, enter an export name, select Indexed items that match your search query and partially indexed items, select Export items with item report, and set the export format to Create PSTs for messages. Leave the other settings on default and click Export.
Step 14. Launch Process Manager and wait for the export status to become Completed.
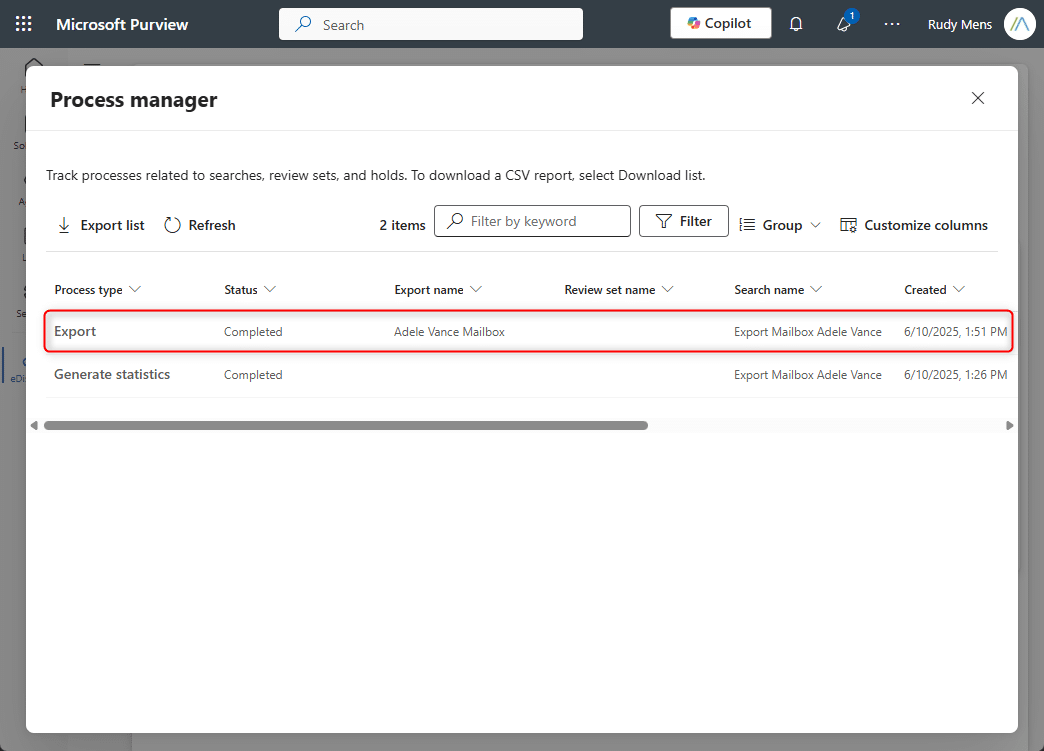
Step 15. Open the completed export job and click Download. Copy the export key, start the Microsoft eDiscovery Export Tool, paste the export key, choose a destination folder, and click Start to download the PST from Microsoft 365 Admin.
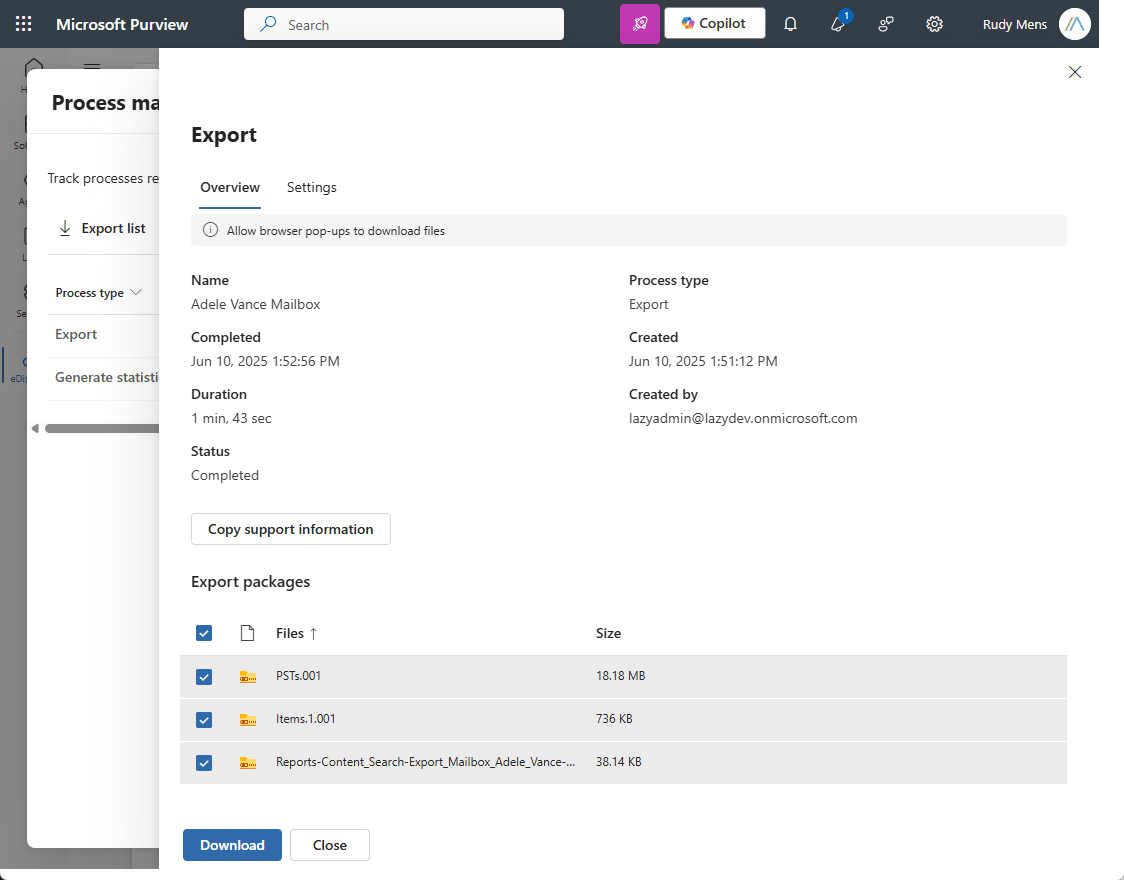
Important notes:
- You need the eDiscovery Manager role and the correct export permissions.
- The features available in Microsoft Purview are based on your Microsoft 365 license.
- Split large mailbox export into multiple PST files.
- You need the Microsoft eDiscovery Export Tool to download the exported data.
- Export packages expire after 14 days so make sure to download them before they are automatically deleted.
Individual User: Backup Office 365 Mailbox to PST Using Outlook (Classic/New)
You don’t necessarily need Microsoft Purview if all you want to do is create a PST from a mailbox you can access in Outlook.
Microsoft now supports PST export in the new Outlook for Windows and the Classic Outlook.
Method A: New Outlook for Windows
- Open Outlook for Windows.
- Go to Settings.
- Choose Files.
- Export Choose
- Click Get started option.
- Choose the Microsoft 365 mailbox or the folders you want to export.
- Follow the export wizard and then save the .pst file that is created.
Method B: Classic Outlook for Windows
- Launch Microsoft Outlook on your Windows PC.
- If you don’t have set up your Microsoft 365 account in Outlook, click File >> Add Account and log in with your Office 365 credentials.
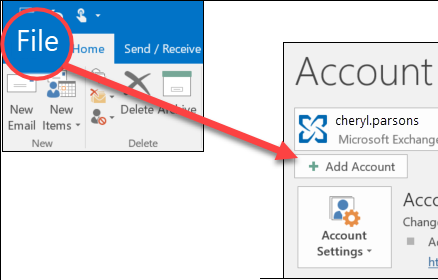
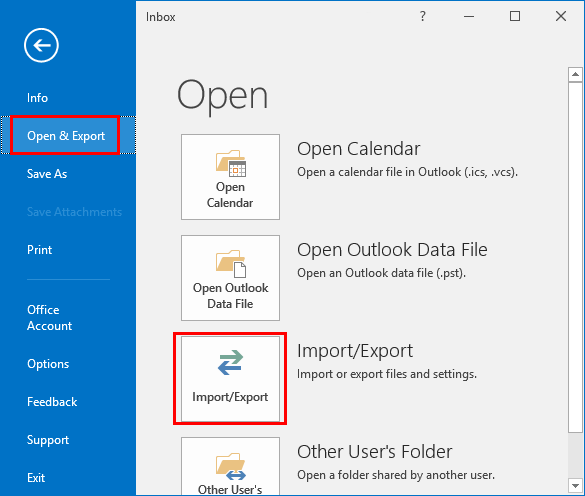
- Once added, let it sync with Outlook first, then click File >> Open & Export >> Import/Export.
- Choose the Export to a file option and press Next.
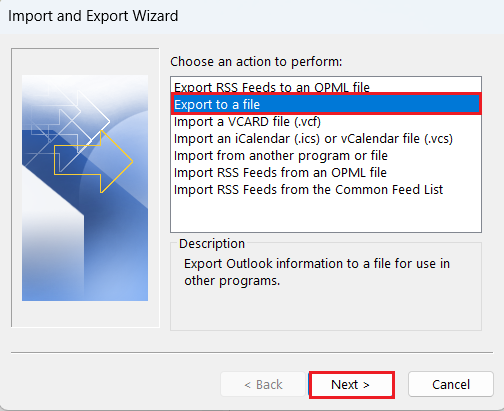
- Select Outlook Data File (.pst), and then click Next.
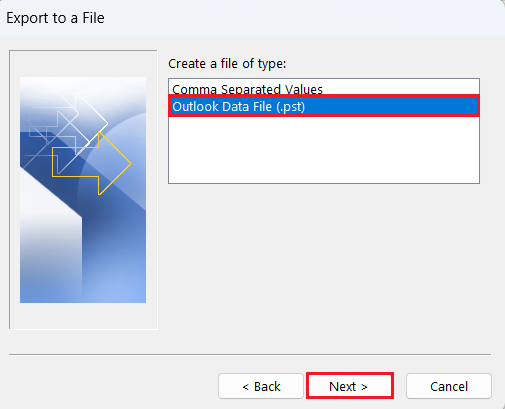
- Choose your Office 365 mailbox or select folder and then click Next.
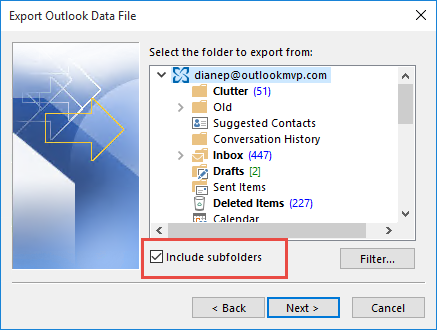
- Browse the destination folder, give it a name & click the Finish button.
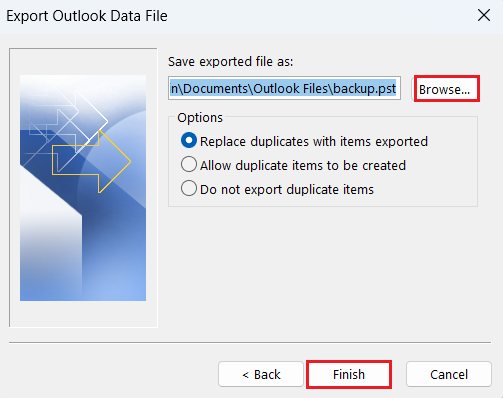
Wait for the export to complete in Outlook.
In a few minutes, Office 365 mailbox data will be saved as a PST file.
Note: This method will only export mailboxes that are already set up in Outlook and available in your account. Cannot be used to export more than one Office 365 mailbox at a time. And, if you are using Cached Exchange Mode, the export will only contain the content cached by Outlook. Microsoft recommends changing the sync setting to All if you need all email available.
What is included in an Outlook export?
Instead of deleting data from the mailbox, Microsoft 365 creates a copy of the mailbox data in Outlook. Email attachments included. But some Outlook metadata is not exported to the PST, like folder views, permissions, AutoArchive settings, message rules and blocked sender lists.
No admin rights, No Outlook: Use a Microsoft 365 Backup Tool
After reading the above methods such as Microsoft’s official method for PST export, Outlook manual method, we found that these are workable depending on some circumstances. However, if you want a quick and simple solution, then you can go with the Advik Office 365 Backup Tool. It provides an easy way to export Office 365 mailboxes directly to PST.
This method can be used by any type of people, be it IT admins, businesses, and users who want to export one or multiple Office 365 mailboxes without going through Microsoft Purview.
You can also download its free demo version to check its efficiency and upgrade later once you are familiar with it’s working;


Steps to Export Office 365 Mailbox to PST from Admin Portal
Step 1. Download, install, and open the Advik Office 365 Backup Tool on your Windows PC.
Step 2. Sign in securely with your Microsoft 365 administrator or user account credentials.
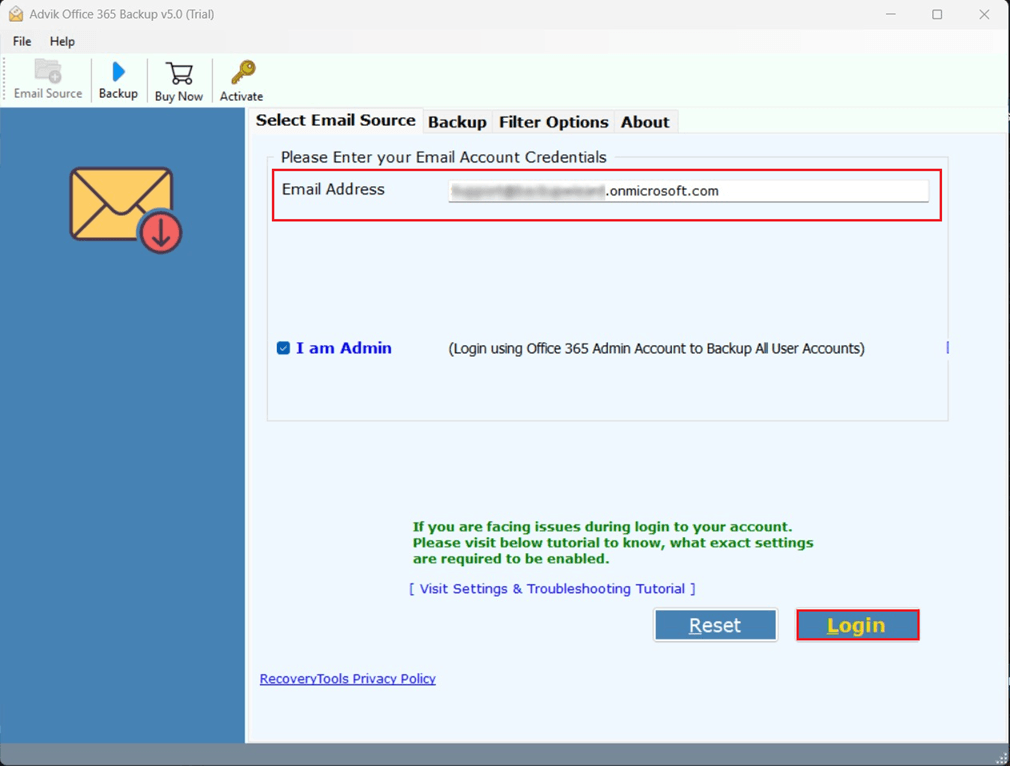
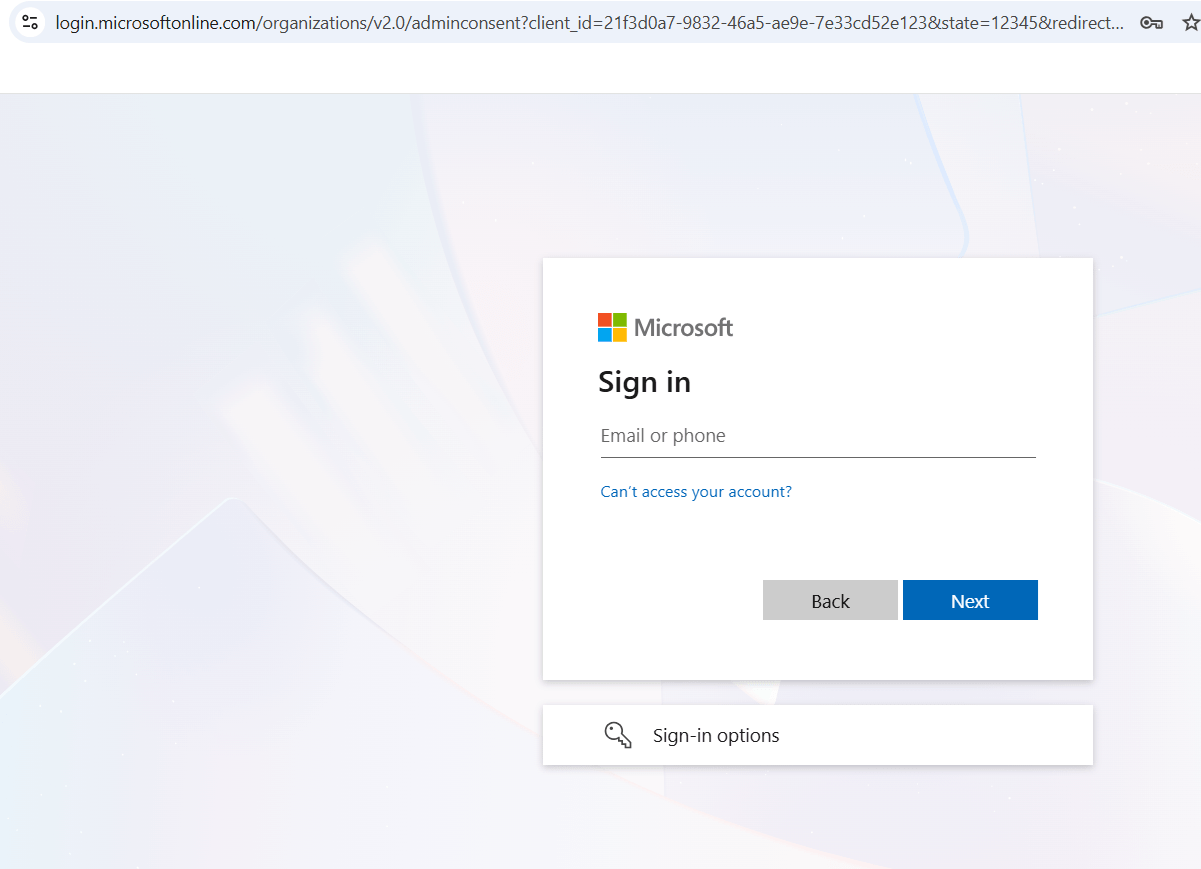
Step 3. The software supports Modern Authentication (OAuth 2.0) to connect to your Microsoft 365 account securely.
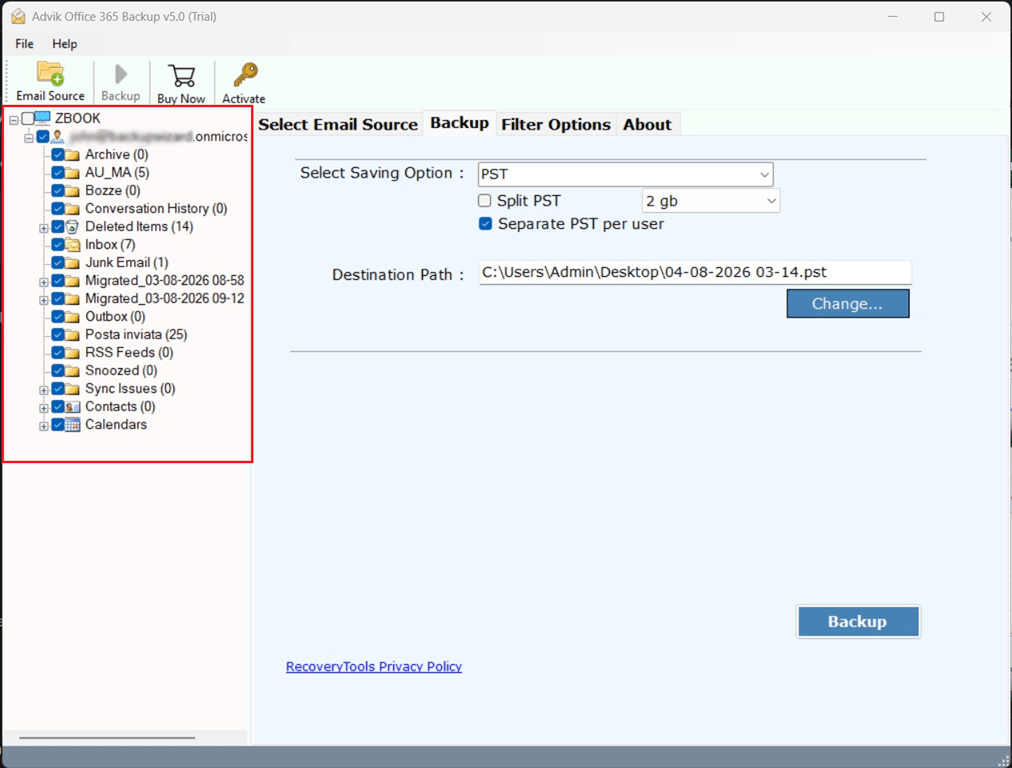
Step 4. Select the mailbox or folders you want to export. You can export user mailbox, shared mailbox, archived mailboxes or multiple Office 365 accounts.
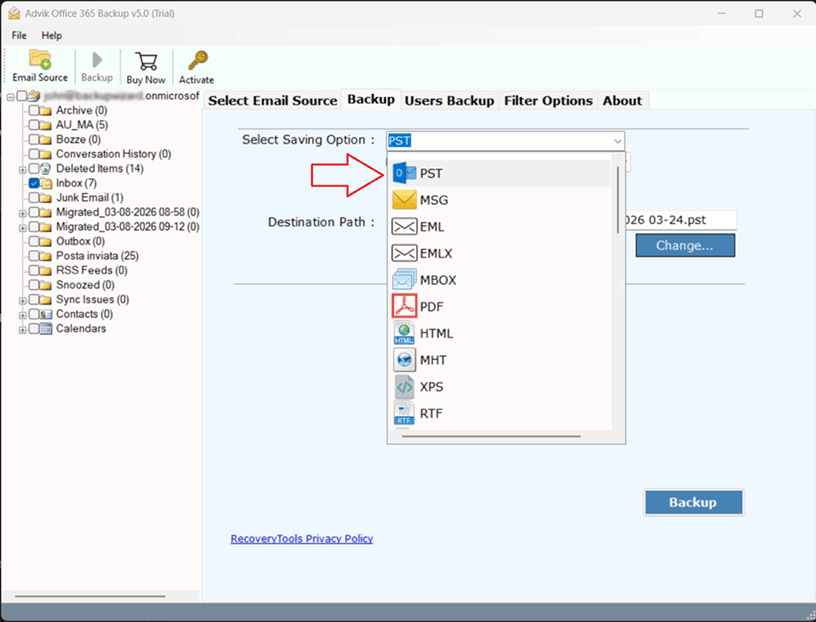
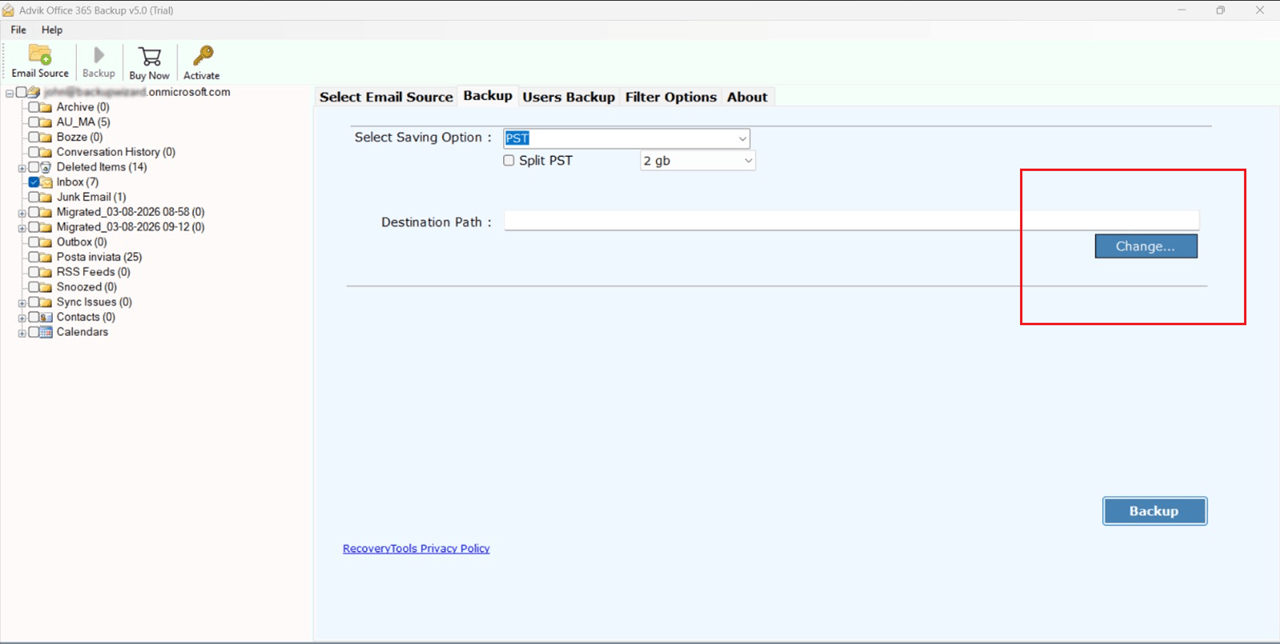
Step 5. Choose PST from the list of saving options.
Step 6. Browse and select the destination folder where you want to save the exported files.
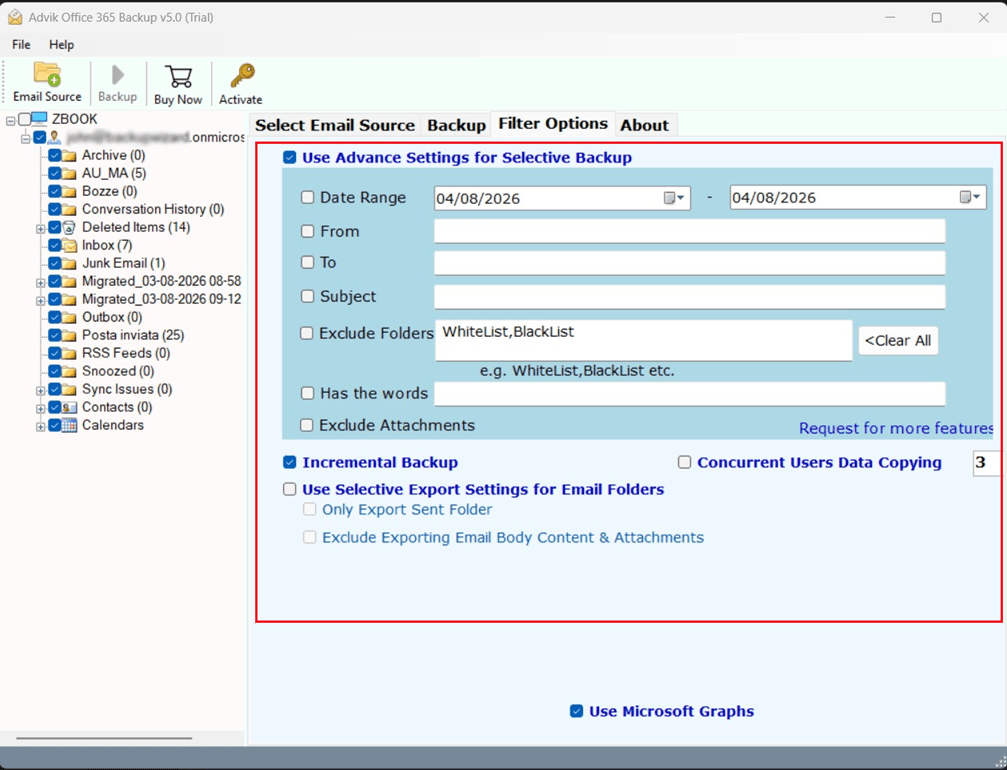
Step 7. If you want to export only particular mailbox data, then use the built-in filters as shown in the screenshot.
Step 8. Click Backup to start exporting Office 365 mailboxes to PST.
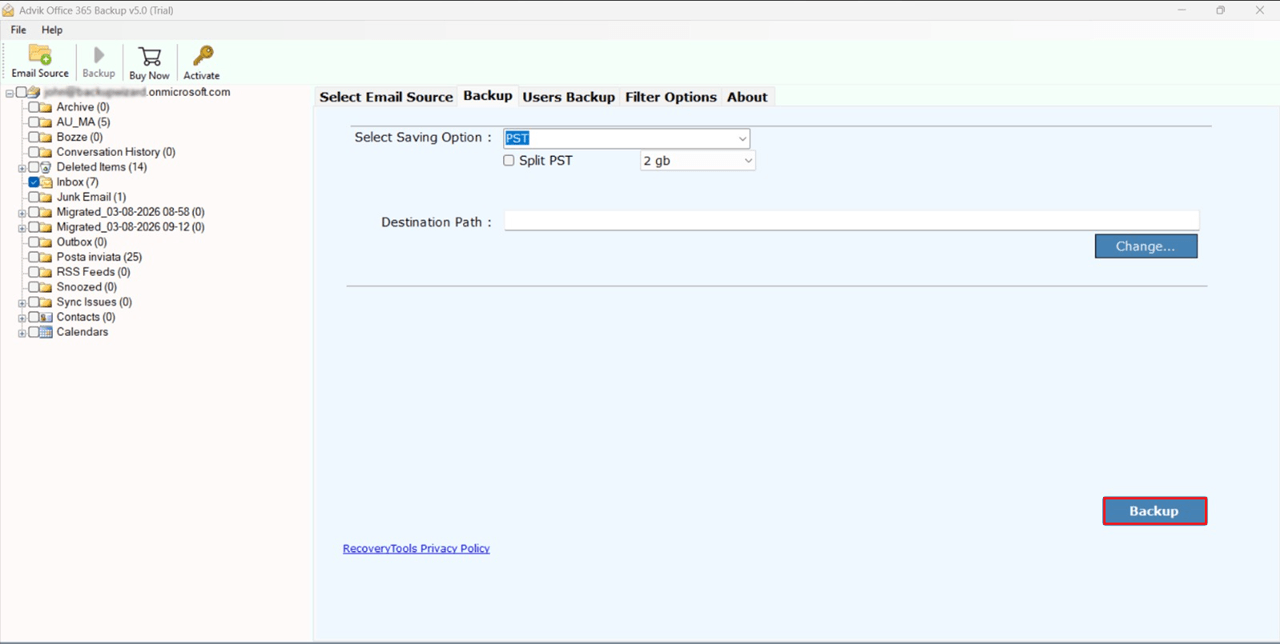
After that, wait for a few minutes until it completes the process.
Then, a log report will automatically generate and appear on your screen. Click OK to finish.
Once the process is complete, go to the destination folder and there you will have the exported PST file.
How long does it take to export a PST from Office 365 Admin Center?
There is no guaranteed fixed time for how long it will take to export a mailbox from Microsoft 365 into a PST file.
Duration might depend on the size of the mailbox, number of mailboxes to search, number of items found, search criteria, package export format and settings, duration of Microsoft 365 processes service, download speed, and storage you have.
If you have a big mailbox, expect hours, not minutes and don’t schedule a time-critical migration around an assumed completion time.
Microsoft also notes that the export time depends on the number and size of the search results.
What is included in the PST File?
The answer depends on the export method you choose.
In an Outlook export, Microsoft says email attachments are included, but not all Outlook-specific metadata.
What will be included in a Purview eDiscovery export is based on the search scope and the export settings. So, check the search results and export configuration and do not assume that each mailbox object is automatically included.
If you need an archive mailbox, shared mailbox, inactive mailbox, deleted content or data that is subject to retention/hold requirements, make sure the mailbox is within the allowed search scope and the eDiscovery configuration for your organization allows the required content to be searched and exported.
Check the PST after Export
After creating the PST, don’t immediately delete or disable the original Microsoft 365 mailbox.
But:
- Verify if the PST file is available at the intended location.
- Look at the size of the file.
- Open the PST file in Outlook.
- Expand folder structure.
- Open a number of new and old messages.
- Open messages that have attachments.
- Check key folders like Inbox, Sent Items, Drafts and custom folders.
- If you’re looking for calendar or contact data, check those out separately.
- Compare a sample of message counts or date ranges with the original mailbox.
- Keep the original mailbox until the backup is validated.
Common Problems and Fixes
“I cannot find Export in Microsoft Purview”
Verify that your account has the correct eDiscovery role and access to the case. For eDiscovery operations, the documented Purview roles are eDiscovery Manager and eDiscovery Administrator. The Content Search option shown in an old tutorial is no longer available.
“The Content Search option shown in an old tutorial isn’t available”
This is probably because the tutorial describes the retired classic eDiscovery experience. Microsoft retired classic Content Search and classic eDiscovery on August 31, 2025. Follow the current eDiscovery workflow.
Current eDiscovery capability enables programmatic export through Microsoft Graph APIs, including PST as an export format. “My Outlook PST doesn’t include all my old email”
“My Outlook PST doesn’t contain all my old email”
First, check your Outlook sync/cache settings. Microsoft notes that Cached Exchange Mode only exports those items that are cached at the time so the default cache period can matter if you need older mail.
“The PST export is taking a long time”
Processing large mailboxes and large search-result sets can take a long time. Instead of restarting the operation repeatedly, check the export status.
Final Takeaway
The method you will choose depends on the type of export;
- Admins need to export organizational mailbox data: Use Microsoft Purview eDiscovery.
- Single user mailbox export: Use Outlook for Windows (New Outlook or Classic Outlook).
- No Outlook or need for a simpler/bulk backup workflow: Use a dedicated Microsoft 365 backup application.
Most importantly, don’t follow old steps that tell you to use retired classic Content Search or the old eDiscovery Export Tool. Microsoft’s current eDiscovery experience has changed and you must write export workflow around the current Purview interface.
Frequently Asked Questions
Q1. Can I create a PST file from the Microsoft 365 Admin Center?
Ans. You cannot directly create a PST file by choosing a mailbox in the Microsoft 365 Admin Center only. Instead, administrators can use the Microsoft Purview eDiscovery option to search the required mailbox data, export the results and download the resultant PST file.
Q2. Why does it take so long for My Content Search to finish?
Ans. The time takes to complete content search depends on a number of factors, including the number of mailboxes, mailbox size, any filters you choose and work load on Microsoft 365 servers. Large organizations or searches in multiple mailboxes may take long time to process than a single mailbox export.
Q3. Can I export a specific folder instead of the whole mailbox?
Ans. Sure. If you’re using Outlook, you can select the folder you want to export to during the export process. Before exporting, you can filter the results in Microsoft Purview using search conditions and also it is possible using a professional tool.
Q4. What happens if I close the browser during the export preparation?
Ans. Microsoft processes the export job on its servers, so closing the browser does not cancel the export job. But, you will need to go back to Microsoft Purview and download the completed export using the Microsoft eDiscovery Export Tool.
Q5. Can I use Outlook while exporting the PST file?
Ans. Yes, but it might affect Outlook’s performance during the export, especially for large mailboxes. For best results, do not make any major changes to your mailbox until the export process is completed.