Office 365 Tenant to Tenant Migration: Step-by-Step Guide
If you’re planning to move data from one Office 365 tenant to another, this guide explains the process clearly.
Office 365 Tenant to tenant migration is common when:
- Two companies merge
- You rebrand or change domains
- Teams reorganize across business units
- You need to meet compliance requirements
In this article, you’ll learn:
- Free manual methods (Outlook, PowerShell)
- Key challenges and limitations
- Using a professional tool can save time and reduce risk
How to Migrate from One Office 365 Tenant to Another Using Outlook?
You can export emails from one account to a PST file and import it into another account.
- Open Microsoft Outlook on your computer.
- Log in to the source Office 365 account where the data currently resides.
- In Outlook, click on File > Info > Add Account.
- Follow the on-screen prompts to log in and add the destination Office 365 account.
- Ensure both accounts are successfully added and visible in Outlook.
- Click on File > Open & Export > Import/Export.
- In the Import and Export Wizard, select Export to a file and click Next.
- Choose Outlook Data File (.pst) as the export type and click Next.
- Select the mailbox or specific folder you want to export, then click Next.
- Choose a destination on your computer to save the exported file.
- Click Finish to start the export process.
- Using Outlook, log in to the destination Office 365 account.
- Ensure that the account is active and ready for data import.
- Click on File > Open & Export > Import/Export.
- In the Import and Export Wizard, select Import from another program or file and click Next.
- Choose Outlook Data File (.pst) as the import type and click Next.
- Browse and select the .pst file you exported earlier.
- Choose the destination folder (e.g., a specific folder in the destination mailbox).
- Click Finish to begin the import process.
Challenges: This method is time-consuming, complex, and requires deep technical knowledge. It’s also not ideal for large-scale or sensitive migrations.
How to Migrate Office 365 Tenant to Another Tenant Without Tool?
Note: For admins comfortable with scripting, PowerShell allows more control over migration.
1. Connect to both Office 365 tenants:
Before starting the migration, connect to both the source and destination tenants using PowerShell. To do this, follow these steps:
a. Install the Azure AD and Exchange Online modules:
Install-Module AzureAD
Install-Module ExchangeOnlineManagement
b. Connect to the source tenant using the Connect-AzureAD and Connect-ExchangeOnline cmdlets:
Connect-AzureAD
Connect-ExchangeOnline -UserPrincipalName <adminUPN>
c. Connect to the destination tenant using the same cmdlets:
Connect-AzureAD
Connect-ExchangeOnline -UserPrincipalName <adminUPN>
2. Export mailboxes from the source tenant:
Use the New-ComplianceSearch and New-ComplianceSearchAction cmdlets to export the mailboxes from the source tenant. This involves creating a compliance search to find the mailbox data and then exporting it to a Outlook data file.
a. Create a new compliance search:
New-ComplianceSearch -Name <searchName> -ExchangeLocation all -ContentMatchQuery <query> -StartDate <startDate> -EndDate <endDate>
b. Start the compliance search:
Start-ComplianceSearch -Identity <searchName>
c. Export the search results to a .pst file:
New-ComplianceSearchAction -SearchName <searchName> -Export -ExportFilePath <filePath>
3. Import mailboxes to the destination tenant:
Use the New-MailboxImportRequest cmdlet to import the mailboxes into the destination tenant. This involves creating a target mailbox and then importing the .pst file into it.
a. Create a new target mailbox:
New-Mailbox -Name <name> -Alias <alias> -UserPrincipalName <UPN> -Password (ConvertTo-SecureString <password> -AsPlainText -Force) -DisplayName <displayName> -FirstName <firstName> -LastName <lastName> -ResetPasswordOnNextLogon $false -PasswordNeverExpires $true -PrimarySmtpAddress <emailAddress>
b. Create a new mailbox import request:
New-MailboxImportRequest -Name <requestName> -Mailbox <mailboxName> -FilePath <filePath> -TargetRootFolder <folderName> -IsArchive
c. Start the mailbox import request:
Start-MailboxImportRequest -Identity <requestName>
4. Verify the migration:
Once the migration is complete, verify that all data has been migrated correctly. This involves checking the mailbox size, verifying that all emails are present, and testing the mailbox functionality.
a. Check the mailbox size:
Get-MailboxStatistics -Identity <mailboxName> | Select-Object TotalItemSize
b. Verify that all emails are present:
Search-Mailbox <mailboxName> -SearchQuery <query>
c. Test the mailbox functionality:
Log in to the target mailbox and verify that all emails, contacts, and calendar entries are present and functioning correctly.
Limitations:
- Requires admin permissions and PowerShell knowledge
- Complex setup
- No built-in progress dashboard
- Care needed to avoid errors
When Manual Methods Aren’t Enough
Consider a professional migration tool if you:
- Have many mailboxes to transfer
- Need to preserve folder structures, permissions, and metadata
- Must reduce downtime and avoid errors
- Want to filter migrations (e.g., date ranges)
These tools automate the process end to end. If your team isn’t comfortable with scripting or you’re short on time, this can be worth exploring.
How to Perform Office 365 Tenant to Tenant Migration Step-by-Step Easily?
After trying all the above manual methods, now try Advik Office 365 Migration Tool for Windows. This software makes it easy to transfer emails from one Office 365 tenant to another without any hassle. You just need to log in with your source and target Office 365 accounts, select the folders you want to move, and start the migration. The tool keeps your email folders, attachments, and details like sender, subject, and date the same.
It also allows you to move all or selected emails using filters like date, subject, or sender. No technical skills are needed, and everything happens securely using Microsoft’s login method. It’s a quick, safe, and user-friendly way to perform tenant-to-tenant migration without data loss.
Download the software and try it for free.

Office 365 Tenant to Tenant Migration Step-by-Step Guide
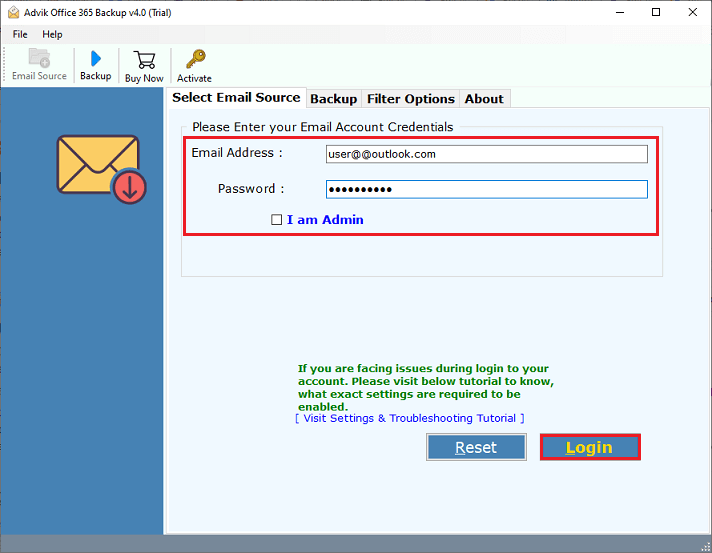
Step 1. Run software & sign in with your source Office 365 email and password.
Step 2. Select the email folders you want to migrate.
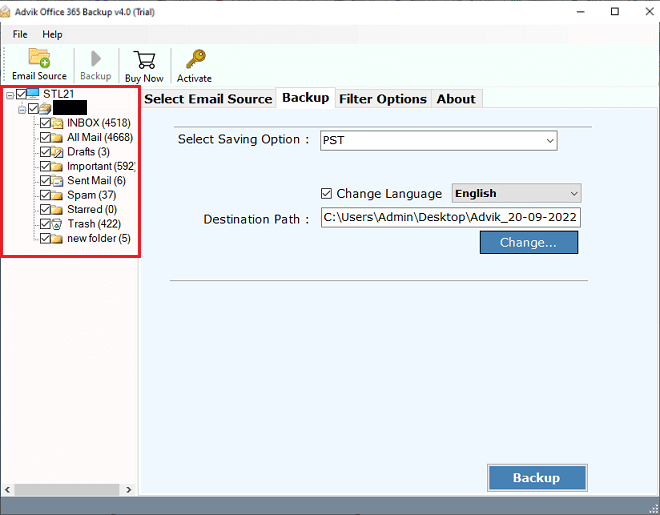
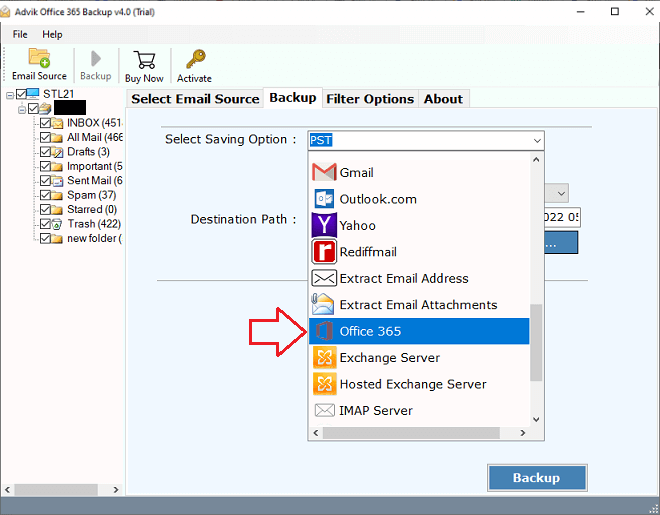
Step 3. Choose Office 365 as a saving option from the list.
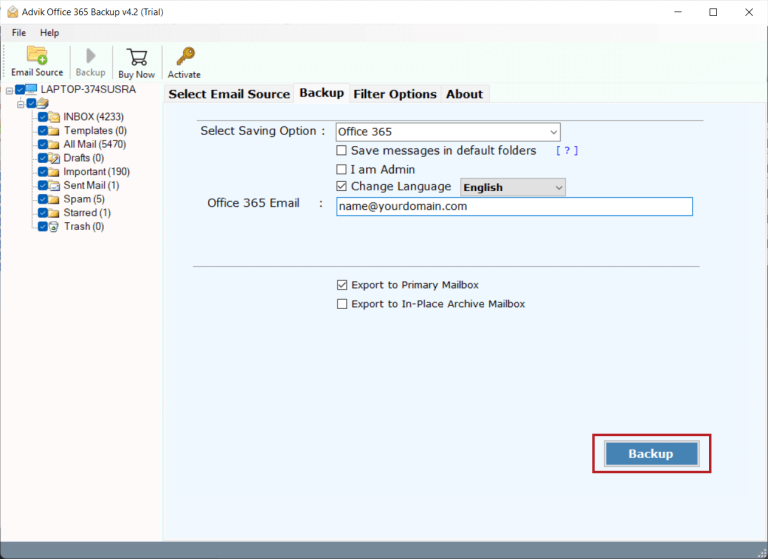
Step 4. Enter email address of your destination tenant account & click Backup.
Step 5. Finally, log in to the Microsoft OAuth page to start.

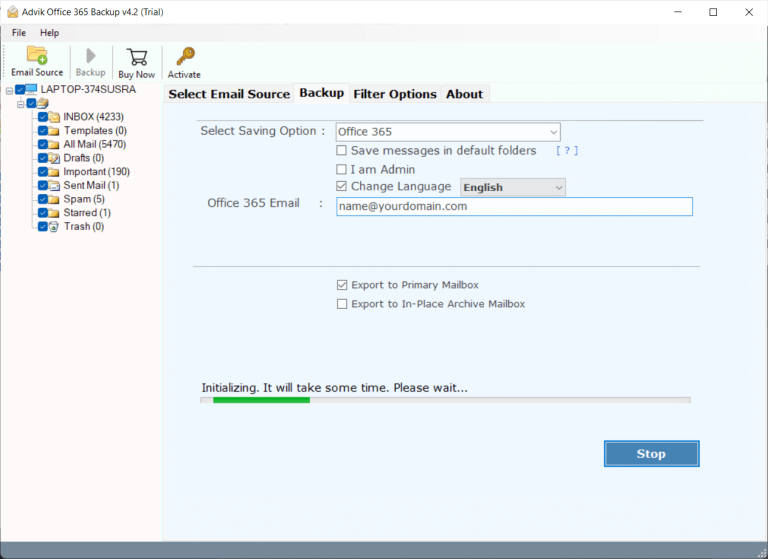
Now, the Office 365 tenant-to-tenant email migration process has started.
Done! This is how you can export emails from one account to another in Office 365.
It is important to make sure to backup your data to avoid issues such as downtime or disruptions during the migration process.
Watch Step By Step Guide for Office 365 Tenant to Tenant Migration
Why Choose Automatic Solution over Manual Methods?
There are many good reasons to choose this tool. It helps you move data from one Office 365 account to another quickly and accurately. Plus, it comes with many helpful features:
- Keeps Folder Structure the Same: Your emails will stay in the same folders after the transfer, just like they were before. This makes it easy to find your emails later.
- Keeps Email Details Safe: All parts of your emails — like who sent it, when, subject line, and To/Cc/Bcc — will stay the same during and after the migration.
- Smart Filters for Selective Transfer: You don’t have to move everything. You can choose which folders to move, or filter emails by subject, date, sender, etc.
- Supports Multiple Languages: You can use the tool in your language, like French, Spanish, Dutch, Japanese, and more.
- More Than Just Office 365 to Office 365: You can also use this tool to move emails from Office 365 to Gmail, Yahoo Mail, or other platforms.
- Many Export Options: You can also save emails in different formats like Office 365 mailbox to PST, PDF, EML, MSG, or MBOX.
- Works on All Windows Versions: You can use this tool on almost any Windows computer — whether it’s Windows 10, 8, 7, Vista, or XP. It also works on both 32-bit and 64-bit systems.
- Helpful Support Team: If you ever need help, Advik’s friendly support team is available 24/7 through live chat.
Final Words
Migrating from one Office 365 tenant to another can feel overwhelming, but you have options:
- For smaller migrations or one-off mailboxes, Outlook export/import can work fine.
- For more control, PowerShell provides flexibility but requires expertise.
If you need a faster, large-scale, or less manual approach, professional tools can help—but first, see if manual options meet your needs.
Take your time to plan, test, and document the process to ensure nothing gets lost.
FAQs
Q1. Is Office 365 tenant to tenant migration free?
Ans. Yes, if done manually using native Microsoft tools. However, automated tools may require a license.
Q2. Can I migrate Teams data during the tenant migration?
Ans. Yes, but it’s complex manually. Most third-party tools support Teams migration easily.
Q3. How long does a tenant to tenant migration take?
Ans. It depends on the size of your data and the method used. Automated tools can speed up the process significantly.
Q4. Do users face downtime during the migration?
Ans. There might be minimal downtime, especially for email services. Planning and automation can help reduce this.
Related Articles